chunk调试

调试技巧

先打印 chunk 对象,如下, 或者按照之前的 《webpack再出发(誉):module调试 - 调试与前言 - 说明》 的方式打印。

1
2
3
4
5
6
7
8
9
10
11
12
13
14
15
seal(callback) {

buildChunkGraph(
this,
/** @type {Entrypoint[]} */ (this.chunkGroups.slice())
);
console.log("这个位置上打印 chunks");
console.log(this.chunks);
console.log(this.chunkGroups);
this.sortModules(this.modules);
this.hooks.afterChunks.call(this.chunks);

this.hooks.optimize.call();

}

调试前,再次充分阅读
玩转webpack一 上
玩转webpack一 下
玩转webpack二
玩转webpack二
webpack 4 源码主流程分析(八):生成 chunk 以及之后的系列

做到理解chunk是什么,什么情况下,会生成chunk,比如知道异步加载会生成chunk等概念。
然后 理出 chunk 阶段的 源代码 起始以及结束位置。
然后直接断点调试,一点点调试。
遇到难点,回头查询上述文章。

chunk调试过程

介绍

module 编译好后,会走到
最终回到 make的回调, chunk的编译从这里开始;

如下:

1
2
3
4
5
6
7
8
9
10
11
12
13
14
15
16
17
18
19
20
21
22
23
24
25
26
27
28
29
30
31
32
33
34
35
36
37
38
# lib\Compiler.js
this.hooks.make - 回调
compilation.finish
compilation.seal

#lib\Compilation.js
# chunk主要编译过程入口,在这里
seal
# 创建chunk
this.addChunk(name)
new Entrypoint(name)
this.namedChunkGroups.set(name, entrypoint);
this.entrypoints.set(name, entrypoint);
this.chunkGroups.push(entrypoint);
# 创建 chunk 与 module 与 ChunkGroup 的联系
GraphHelpers.connectChunkGroupAndChunk(entrypoint, chunk);
GraphHelpers.connectChunkAndModule(chunk, module);

# 通过 buildChunkGraph 的三个阶段,让所有的 module、chunk、chunkGroup 之间都建立了联系,形成了 chunk Graph
# !!!!这里代码逻辑较为复杂,与webpack主流程理解关系不大,可以看看不用深究!!!!
buildChunkGraph

# 下面是 chunk的优化阶段
# !!!!这个阶段,与webpack主流程理解关系不大,可以看看不用深究!!!!
this.hooks.afterChunks.call

this.hooks.optimizeChunksAdvanced.call(this.chunks, this.chunkGroups);

# 设置 module.id
this.hooks.reviveModules.call(this.modules, this.records);
# 设置 chunk.id
this.hooks.reviveChunks.call(this.chunks, this.records);
this.hooks.beforeHash.call()
# 创建 module hash 创建 chunk hash
this.createHash();

# chunk 相关的编译到此为止
this.hooks.afterHash.call();

SplitChunksPlugin

this.hooks.optimizeChunksAdvanced.call(this.chunks, this.chunkGroups);
会触发插件SplitChunksPlugin 优化切割 chunk
参考

说明

chunk 编译阶段逻辑大多与 webpack主流程无关,可以大略看看。

资源(assets)的构建调试

调试技巧

可以先打印 this.assets 出来看看

1
2
3
4
# 后面回到 lib\Compilation.js  的 createChunkAssets 内
# 在这里生成 更新 this.assets this.assetsInfo
# assets资源构建完成
this.emitAsset(file, source, assetInfo);

拿build好的源码对照

这个步骤用于生成源码最终的内容,所以调试前,先把build好的源码 复制一份,
以作比较。

点击这里 查看本地demo 编译后的源码

chunk调试过程

步骤

调试技巧 如前, 这部分 还是在 seal 函数内继续执行:

1
2
3
4
5
6
7
8
9
10
11
12
13
14
15
16
17
18
19
20
21
22
23
24
25
26
27
28
29
30
31
32
33
34

#lib\Compilation.js
seal
this.hooks.beforeModuleAssets.call();
# 本demo 这一步其实没有什么操作,可以略过
this.createModuleAssets();

# 核心步骤
this.createChunkAssets();
template.getRenderManifest

# lib\MainTemplate.js
getRenderManifest
this.hooks.renderManifest.call(result, options);

# lib\JavascriptModulesPlugin.js
compilation.mainTemplate.hooks.renderManifest.tap
result.push({
render: () =>
# 这是lib\MainTemplate.js 的 render()
compilation.mainTemplate.render(),
});


source = fileManifest.render();

# lib\MainTemplate.js
# 这是很核心的地方,js文件的 source 构建都在这里。
render

# 后面回到 lib\Compilation.js 的 createChunkAssets 内
# 在这里生成 更新 this.assets this.assetsInfo
# assets资源构建完成
this.emitAsset(file, source, assetInfo);

source构建

这是很核心的地方,js文件的 内容 构建都在这里。

Bootstrap 可以理解为底层源码依赖的安装。

1
2
3
4
5
6
7
8
9
10
11
12
13
14
15
16
17
18
19
20
21
22
23
24
25
26
27
28
29
30
31
//  lib\MainTemplate.js
render(hash, chunk, moduleTemplate, dependencyTemplates) {
// 这里引入定义 __webpack_require__ 函数,属于webpack的源码模板,与业务代码无关
const buf = this.renderBootstrap(
hash,
chunk,
moduleTemplate,
dependencyTemplates
);
// 这里构建你自己的业务源码,其中的 require或import 替换为 __webpack_require__ 都在这里。
let source = this.hooks.render.call(
new OriginalSource(
Template.prefix(buf, " \t") + "\n",
"webpack/bootstrap"
),
chunk,
hash,
moduleTemplate,
dependencyTemplates
);
if (chunk.hasEntryModule()) {
source = this.hooks.renderWithEntry.call(source, chunk, hash);
}
if (!source) {
throw new Error(
"Compiler error: MainTemplate plugin 'render' should return something"
);
}
chunk.rendered = true;
return new ConcatSource(source, ";");
}

require或import 替换为 webpack_require

涉及的js 与 数据有

1
2
3
4
5
6
7
8
9
10
lib\JavascriptModulesPlugin.js
lib\Template.js
lib\JavascriptGenerator.js

lib\dependencies\ModuleDependencyTemplateAsId.js

0.CommonJsRequireDependency {module: NormalModule, weak: false, optional: false, loc: SourceLocation, request: './utils/mtest', …}
1:RequireHeaderDependency {module: null, weak: false, optional: false, loc: SourceLocation, range: Array(2)}
2:CommonJsRequireDependency {module: NormalModule, weak: false, optional: false, loc: SourceLocation, request: './utils/hellowworld', …}
3:RequireHeaderDependency {module: null, weak: false, optional: false, loc: SourceLocation, range: Array(2)}

替换的核心流程在这里:

1
2
3
4
5
6
7
8
9
10
11
12
13
14
15
16
17
18
19
// lib\JavascriptGenerator.js
sourceBlock(
module,
block,
availableVars,
dependencyTemplates,
source,
runtimeTemplate
) {
for (const dependency of block.dependencies) {
this.sourceDependency(
dependency,
dependencyTemplates,
source,
runtimeTemplate
);
}

}

认识dependencies (CommonJsRequireDependency RequireHeaderDependency)

参考上面。

source由哪些模板生成的

概述

1
2
3
4
// webpack 自己生成 __webpack_require__ 函数 其实就是所说的 runtime 
// webpack 生成包裹代码
// loader 生成的业务代码
// webapck 的工具 将业务代码的 import export require modules 等等 如 CommonJsRequireDependency RequireHeaderDependency

更多详细 参考

可以把最终build出来的源码对着看。或者直接搜索 build源码中的关键字,直接定位到对于的模板或生成的地方。
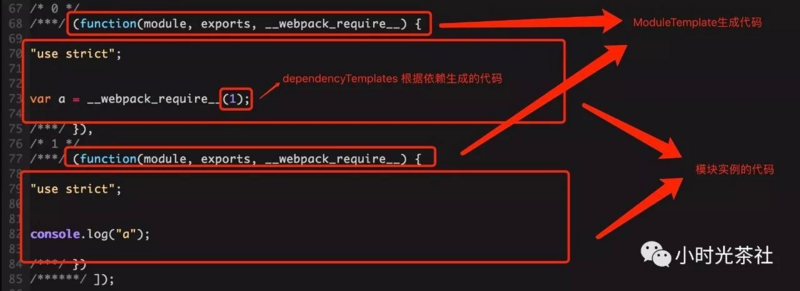
Template

  • mainTemplate 对应 MainTemplate 类,用来渲染入口 chunk
  • chunkTemplate 对应 ChunkTemplate 类,用来传染非入口 chunk
  • moduleTemplate 对应 ModuleTemplate,用来渲染 chunk 中的模块
  • dependencyTemplates 记录每一个依赖类对应的模板

文件生成

步骤

调试技巧 如前, 这部分 还是在 seal 函数内继续执行:

1
2
3
4
5
6
7
8
9
10
11
12
13
14
15
16
17
18
19
20
21
22
23
24
25
26
27
28
29
30
31
32
33
34
35
36
37
38
39
40
41
42
43
44
45
46
47
48

#lib\Compilation.js
seal

#接着上面的步骤
#通过这个 callback 回到 lib\Compiler.js compilation.seal 的回调
this.hooks.afterSeal.callAsync(callback)

# lib\Compiler.js
compilation.seal - 的回调
this.hooks.afterCompile

#run 内的
onCompiled

this.emitAssets

this.outputFileSystem.mkdirp(outputPath, emitFiles)
emitFiles
compilation.getAssets()

#lib\Compilation.js
getAssets


# lib\Compiler.js
# emitAssets 的 writeOut 内
# content 最终js文件内容
let content = source.source();

#递归生成文件
writeOut


this.hooks.afterEmit


this.emitRecords(err => {
# 生成Stats对象,可以这里打印Stats对象
const stats = new Stats(compilation);
stats.startTime = startTime;
stats.endTime = Date.now();
this.hooks.done.callAsync(stats, err => {

# 整个webpack 打包编译流程完毕
return finalCallback(null, stats);
});
});

生成Stats 对象

参考上述《步骤》
Stats 意为统计的意思,其主要是对本次 compilation 过程的一个统计,
比如生成 比如编译经历了多少时间。等等。

emitFiles

这块文件生成的代码,可以关注下。
遇到文件夹与文件的处理方式。

1
2
3
4
5
6
7
8
9
10
11
12
13
14
15
16
17
18
19
20
21
22
23
24
25
26
27
28
29
30
31
32
33
34
35
36
37
38
39
// lib\Compiler.js
const writeOut = err => {
if (err) return callback(err);
const targetPath = this.outputFileSystem.join(
outputPath,
targetFile
);
// TODO webpack 5 remove futureEmitAssets option and make it on by default
if (this.options.output.futureEmitAssets) {

} else {
if (source.existsAt === targetPath) {
source.emitted = false;
return callback();
}
let content = source.source();

if (!Buffer.isBuffer(content)) {
content = Buffer.from(content, "utf8");
}

source.existsAt = targetPath;
source.emitted = true;
this.outputFileSystem.writeFile(targetPath, content, err => {
if (err) return callback(err);
this.hooks.assetEmitted.callAsync(file, content, callback);
});
}
};

if (targetFile.match(/\/|\\/)) {
const dir = path.dirname(targetFile);
this.outputFileSystem.mkdirp(
this.outputFileSystem.join(outputPath, dir),
writeOut
);
} else {
writeOut();
}

打包后文件解析

参考

watch

有兴趣的话,可以了解,不影响了解主流程
参考

其他

钩子的思想

可以借鉴源码中的写法,很多比如 submit 要做的事情,都通过钩子实现,
为了足够灵活,钩子会得到完整的实例instance,
这种推荐在写组件或者大型脚手架 或插件使用,
不建议在业务组件中使用,因为 这种滥用 instance或this的方式,
太过灵活,导致问题不好定位。

watch与outputFileSystem、 inputFileSystem

Compiler 实例在一开始也会初始化输入输出,分别是 inputFileSystem 和 outputFileSystem 属性,一般情况下这两个属性都是对应的 nodejs 中拓展后的 fs 对象。
但是有一点要注意,当 Compiler 实例以 watch模式运行时, outputFileSystem 会被重写成内存输出对象。
也就是说,实际上在 watch 模式下,webpack 构建后的文件并不是保存在磁盘中,而是保存在内存中,内存也是一种存储器,有别于普通的磁盘,但功能是一样的,参考计算机基础(一):基础知识 - 计算机存储器分类

调试demo地址

用于主调试的 webpack源码仓库: version-4.46.0-chunk

点击这里 查看本地demo 编译后的源码

待研究问题

开发模式下,webpack-dev-server模式下,webpack 如何 写入 内存的 fs 是如何实现的, 可以不用直接看源码,
而是直接去看相关的文档介绍,了解即可
这部分大概率是 webpack-dev-middleware 实现的,
参考官网-自定义文件系统(Custom File Systems)