
基础知识
云服务器
阿里云不支持但网卡多IP的配置
静态服务器和反向代理
nginx是一款静态服务器,可以自行处理客户端静态资源如js、css 等等的返回;
nginx并不能处理动态资源接口,所有的动态接口,如商品价格、库存量 等请求 都转发给 业务服务器,由业务服务器 返回给nginx,再由nginx返回给客户端。
这个过程中nginx起到一个代理的作用,上面的过程也是 nginx 反向代理的过程;
nginx 最重要的两个功能就是 静态服务器 和 反向代理;
其他的如负载均衡(当nginx作为代理时,当有多台服务器时,nginx如何将请求均衡发给多台服务器,达到负载均衡 性能优化),都是因此延伸出来。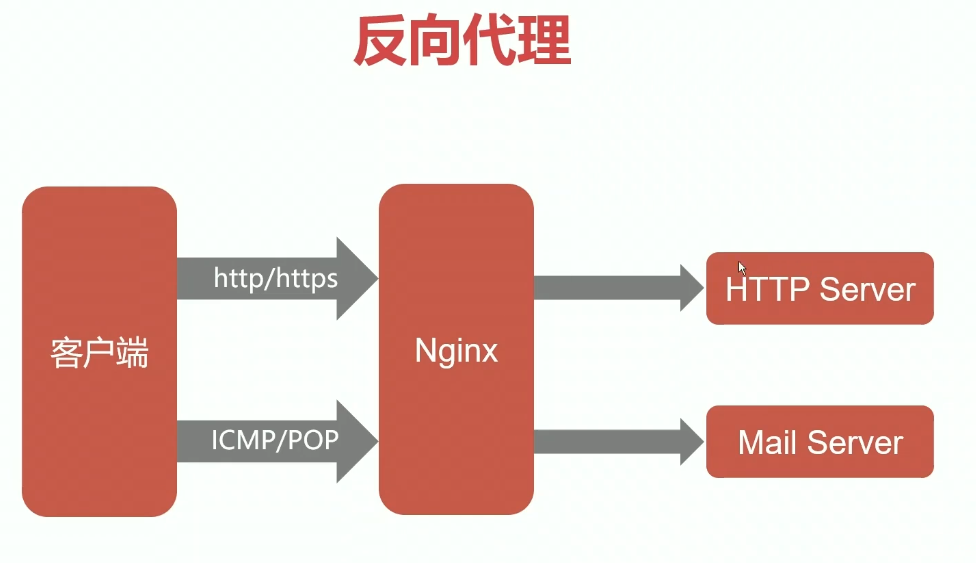
另外可参考《一个http请求的全流程》图片看反向代理。
反向代理其实就是 转发代理。
nginx特点
nginx 特点介绍
高并发、高性能
nginx为 高并发而生;
通过 增加进程 来适应高并发;
通过合理设计 达到高性能扩展性好
异步非阻塞的事件驱动模型
nginx相比apache的优势
apache是上一代服务器(当时的cpu也是单核的,apache也是根据这个单核cpu设计的,这个理由只当看看),产生比较早,特点如下:
- 一个进程处理一个请求;
- 阻塞式的
nginx是最新一代服务器(根据当代多核cpu设计的,这个理由只当看看),特点如下:
- 一个进程处理多个请求
- 非阻塞式的
因为以上两个特点,nginx也具有了高并发能力
nginx产生和流行的原因
互联网快速增长,高并发需求大,apache处理请求的低效性,导致了nginx 这种能高并发服务器的产生。
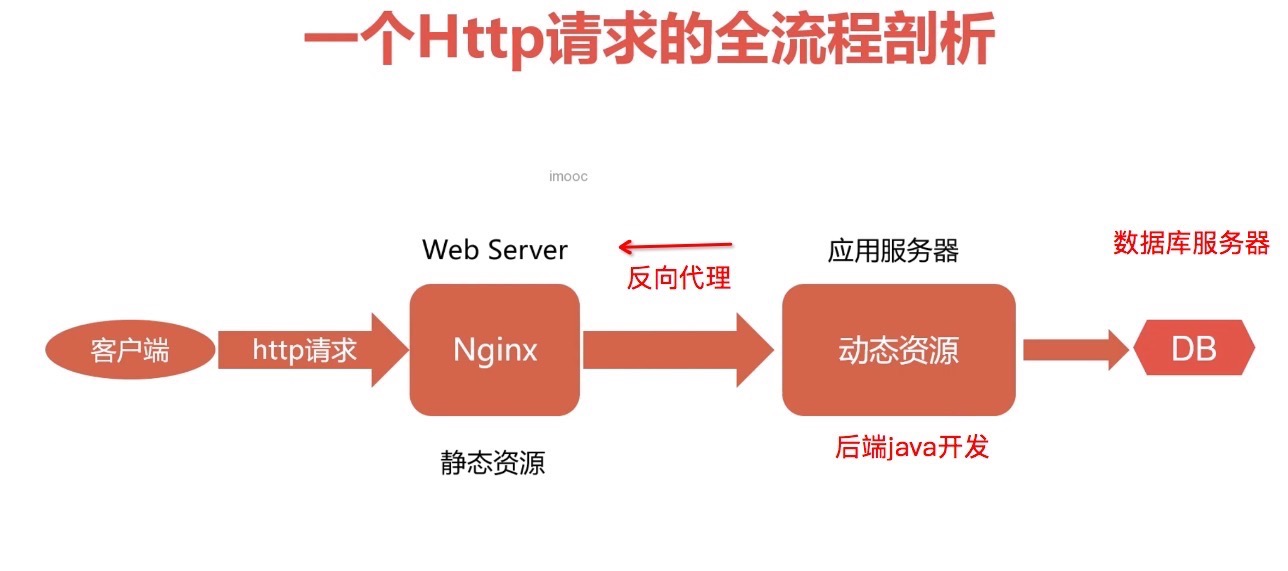
一个http请求 与 nginx
一个http请求的全流程
如下:
- 请求发送到nginx,nginx响应静态资源;
- 动态请求,nginx作为反向代理:将请求发送给 应用服务器(就是后端人员写的服务器),再有应用服务器响应nginx,由nginx返回客户端。
- 应用服务器 接受请求后,请求DB 数据库服务器,对数据库进行增删改查,由数据库服务器响应最新数据给应用服务器。
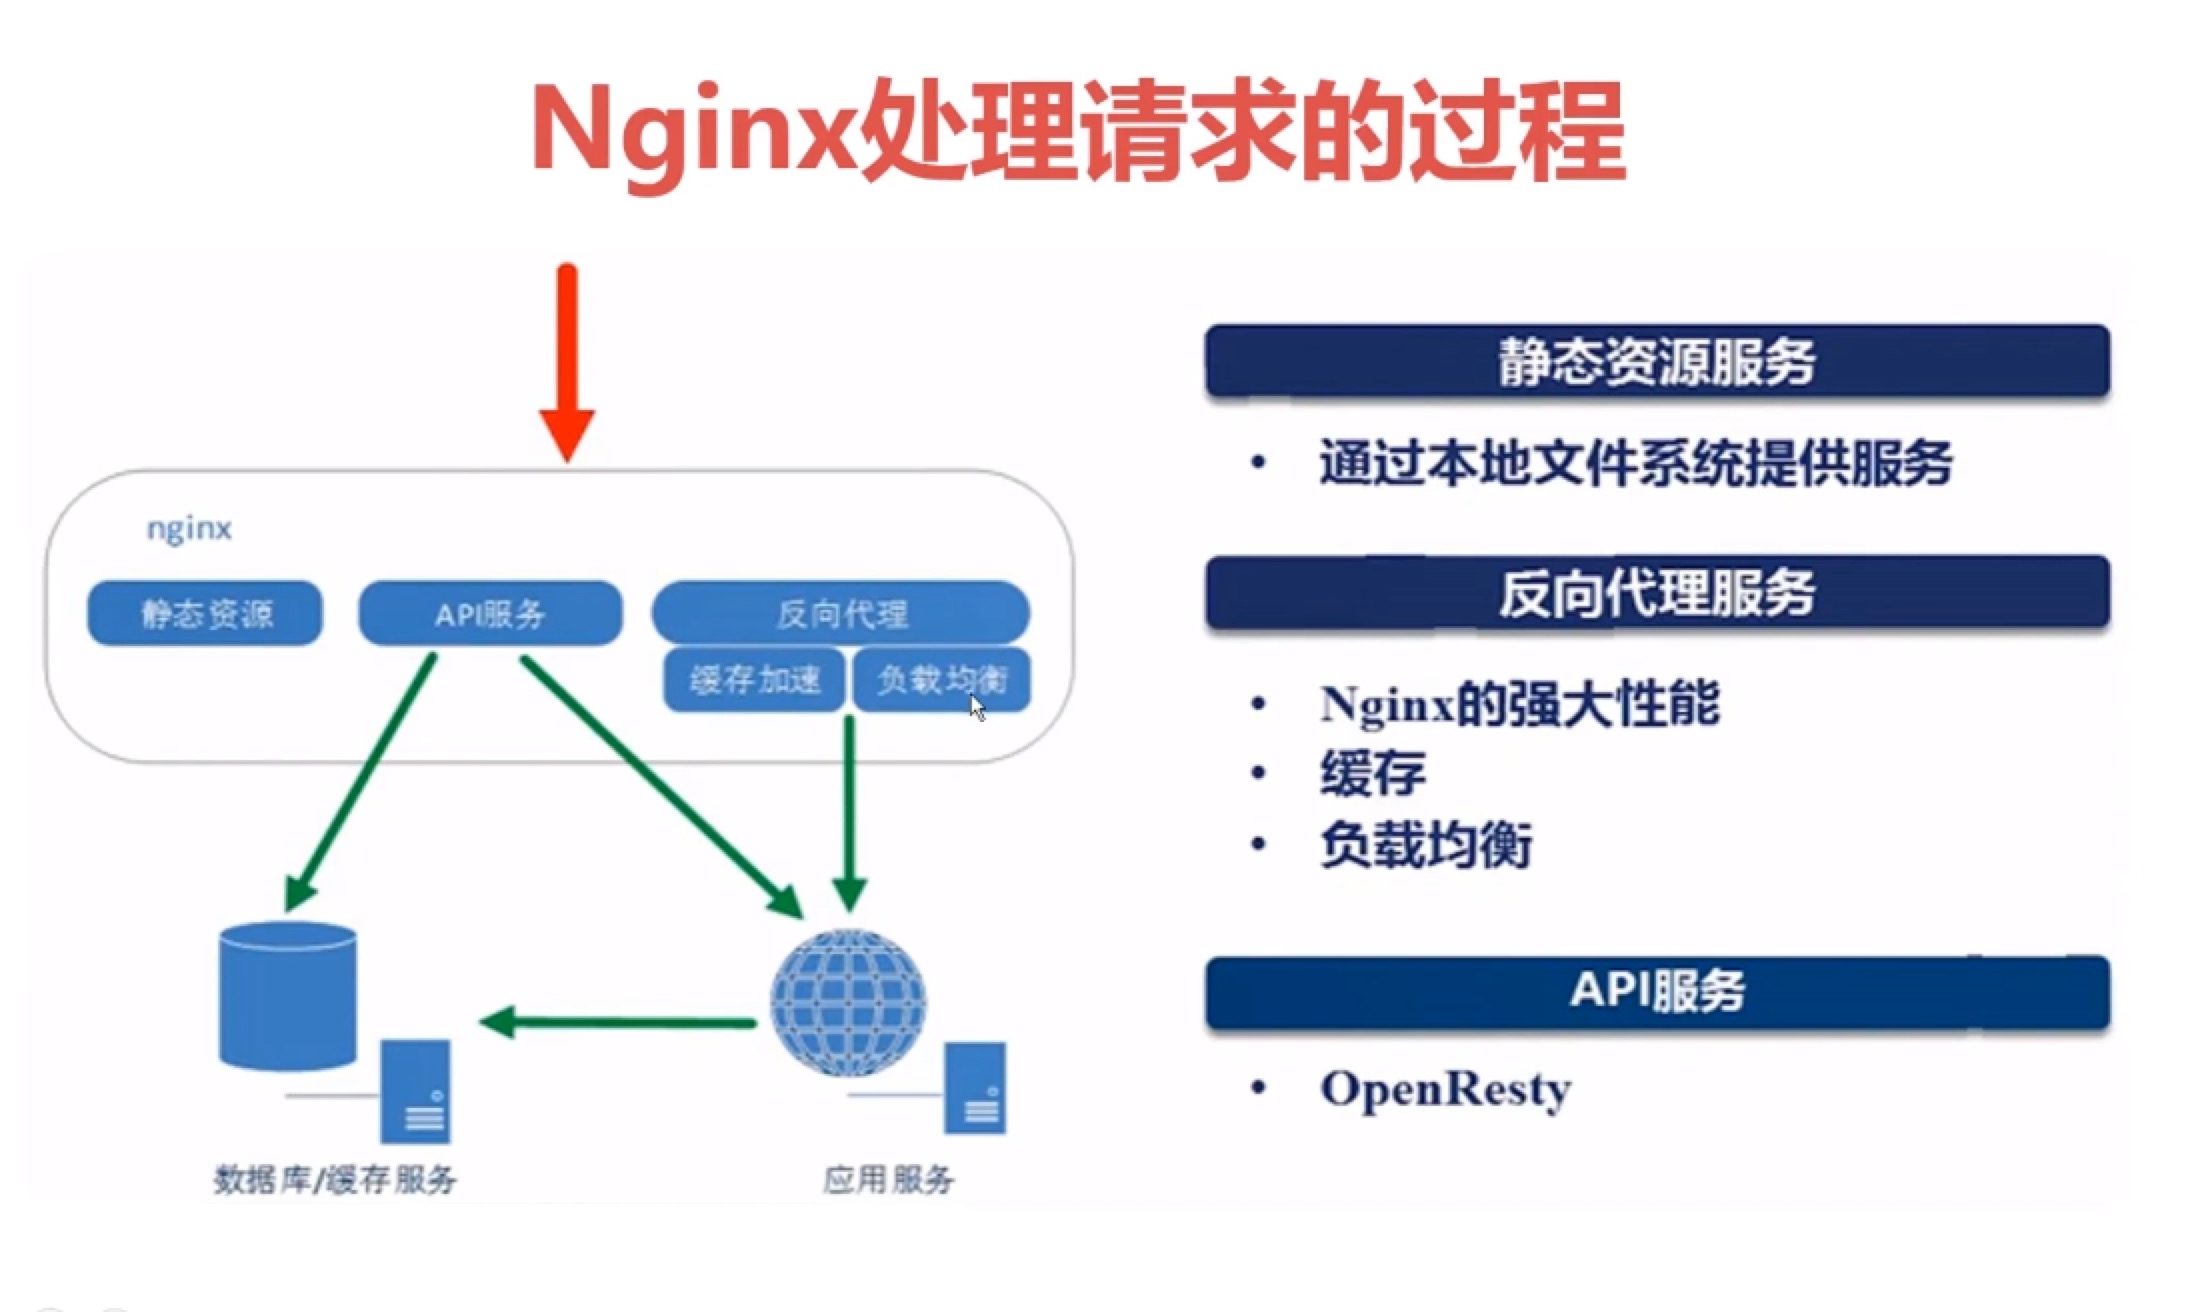
nginx处理请求过程
对于下图说明:
- 静态服务器:公司通过在本地建立一个资源目录库,用于返回静态资源
- 大中型公司才会将 应用服务和数据库服务器进行分离,一般应用通常将应用服务器和数据库服务器放在同一个机器上,不用做数据库与应用服务器的分离;
静态资源响应很快,通常一段时间内能处理5万个请求,但一个动态请求因为要走反向代理 到 应用服务器 到数据库服务器 所以可能只能处理5000条数据,因此就有了性能优化的需求:
- 比如 反向代理的时候,在nginx这里做缓存处理,相同的请求直接缓存返回,不需要往下请求,达到加速;
- 当公司有多个应用服务器时,nginx不要将所有请求发送到一台机器,通过算法均衡发送,达到负载均衡;
数据库旁边的缓存服务,也是用于加速的服务器,可以不部署。
nginx的变量
变量分类
nginx是用来处理请求的服务器,因此它的变量主要是围绕 请求处理而分类的。
如下,有5种分类:
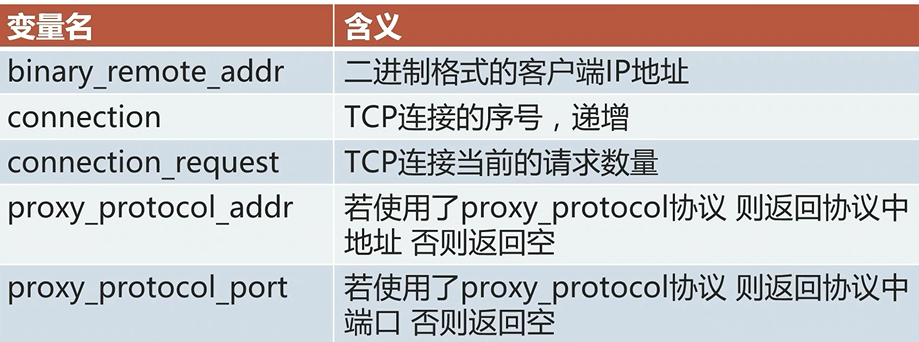
为什么有tcp链接分类变量:
其中 http 建立在tcp\ip协议上的,建立http链接,要经过tcp链接,在此之上进行http数据传输。
理解 nginx内部变量:
nginx自身运行时,也会产生相关变量。
tcp连接相关变量
remote_addr 客户端IP地址
remote_port 客户端端口
server_addr 服务端IP地址
server_port 服务端端口
server_protocol 服务端协议 比如http1.0 http1.1
http请求过程相关变量
uri 请求的url,不包含参数
request_uri 请求的url,包含参数
scheme 协议名,http或https
request_method 请求方法
request_length 全部请求的长度,包括请求行、请求头、请求体;
args 全部参数字符串
arg_参数名 获取具体参数名的参数值
is_args 判断url中是否有参数,如果有参数,则返回?,否则返回空;
query_string 与 args相同,二者可互换使用
remote_user 由http basic authentication协议传入的用户名
host 先看请求行,再看请求头,最后找server_name
http_user_agent 用户浏览器
http_referer 从那些链接过来
http_via 经过一层代理服务器,添加对应代理服务器信息
http_x_forwarded_for 获取用户真实IP
http_cookie 用户cookie
处理http请求相关变量
request_time 处理请求已耗费的时间
request_completion 请求处理完成返回ok,否则返回空;
server_name 匹配上请求的server_name值
https 若开启https,则返回on,否则返回空;
request_filename 磁盘文件系统待访问文件的完整路径
document_root 由uri和root/alias规则生成的文件路径
realpath_root 将document_root中的软链接换成真实路径
limit_rate 返回响应时的速度上限值
使用信号量管理master和worker
linux中的常用信号量
1 | SIGHLD kill -17 pid 子进程down掉后,向其父进程发送的信号 |
信号量的两种用法
1 | 如上, |
nginx的 信号量 管理
master主进程 worker子进程
nginx就是有一个master 主进程,和若干个 worker子进程构成的。
信号量 管理nginx
可以用信号量 管理 master进程;
worker进程一般是master进程控制的;
一般使用信号量管理master进程,进而让master进程管理子进程;
也可使用信号量直接管理worker子进程(虽然不推荐),
为什么不推荐呢,因为一旦直接关闭子进程,子进程会让master进程发送信号,master然重新启动一个子进程。
命令行本质也是信号量 管理
命令行可以操作下面操作:
reload 底层利用的是HUP信号量
reload 底层利用的是USER1信号量
stop 底层利用的是TERM信号量
quit 底层利用的是QUIT信号量
认识 nginx进程
nginx的配置文件
worker_processes auto; //自动识别电脑有几个cpu,下面的例子说明识别出4个进程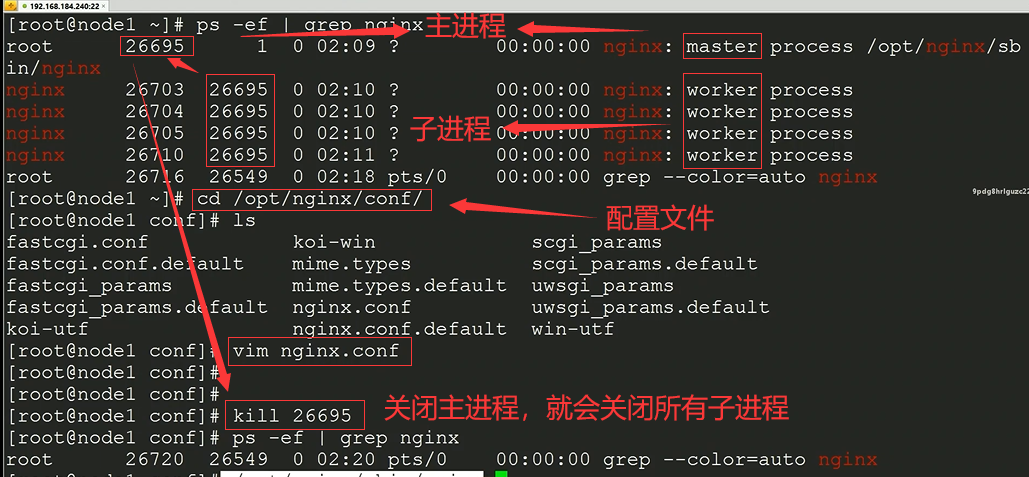
nginx 配置文件重载过程与原理
过程分析
- 配置文件更改,
- master主进程读取配置文件,检测是否有语法错误,若有,则不执行重载,
- 若无语法错误,master则立即生成新配置的子进程,同时通知老的子进程执行完后关闭。
- 此时就存在新的和老的子进程同时存在的情况。
- 什么是老的子进程执行完之后完毕,
- 比如,客户在浏览网页的时候,与老的子进程建立了连接,一直等客户关闭页面关闭连接,
老的子进程才退出。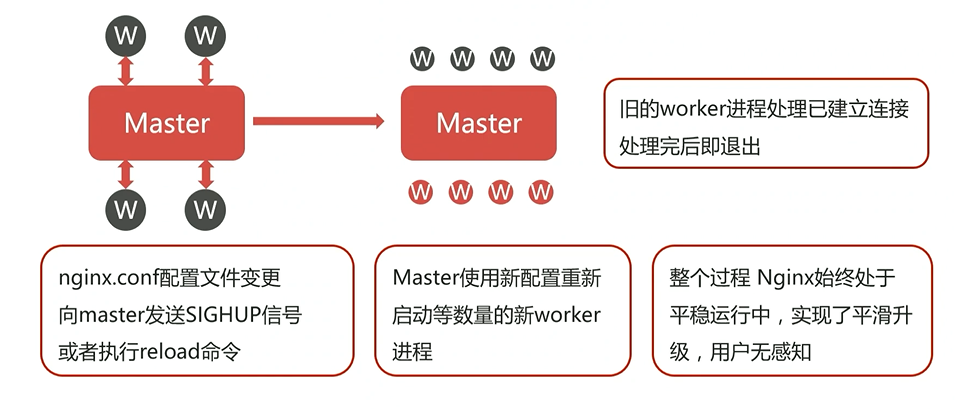
会同时存在新旧两种进程
如上,此时进程数是两倍。
nginx热部署升级 的过程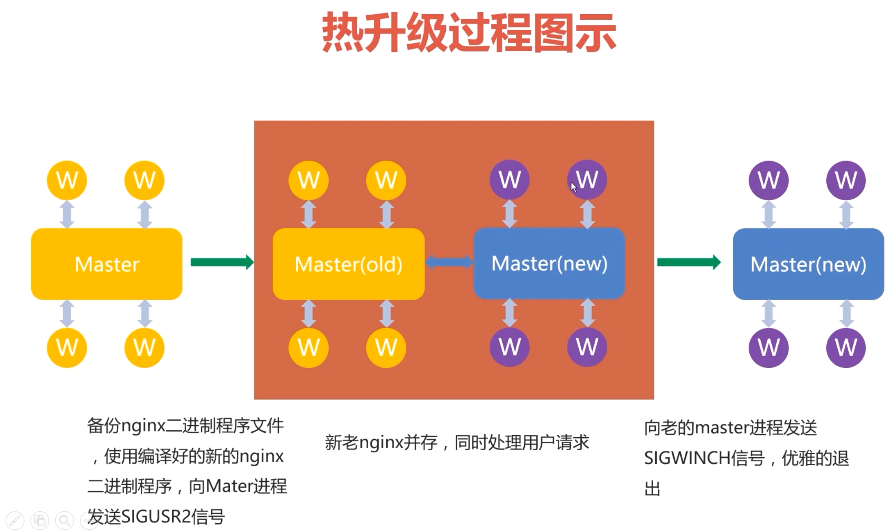
nginx 安装、使用
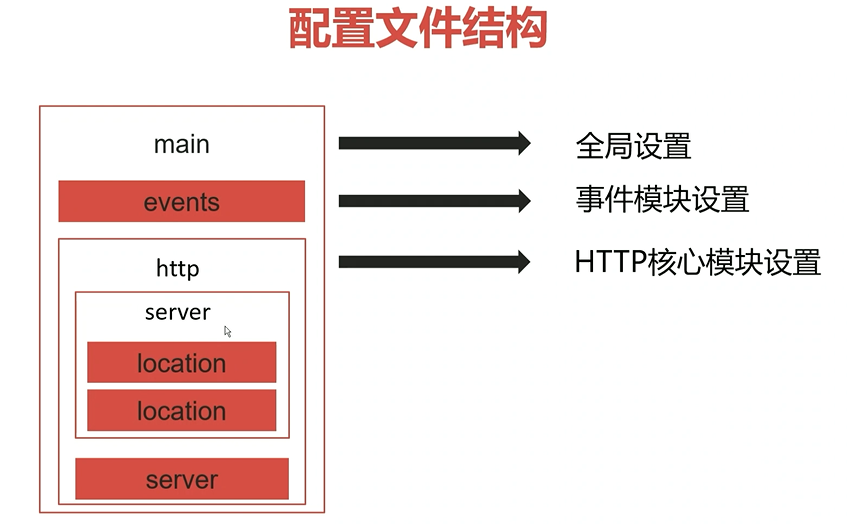
配置文件结构
nginx环境准备
确认关闭iptables规则1
2iptables -F #关闭规则
iptables -t nat -L #查看规则
确认停用selinux1
2yum -y install gcc tcc-c++ autoconf pcre pcre-devel make automake
yum -y install wget httpd-tools vim
nginx两种安装方式
指定源和版本(强大)
这种方法需要自己配置下,好处是,
可以自己安装指定版本的nginx,
不用自己下载指定版本的nginx包,拷贝到centos中安装。
进入官网;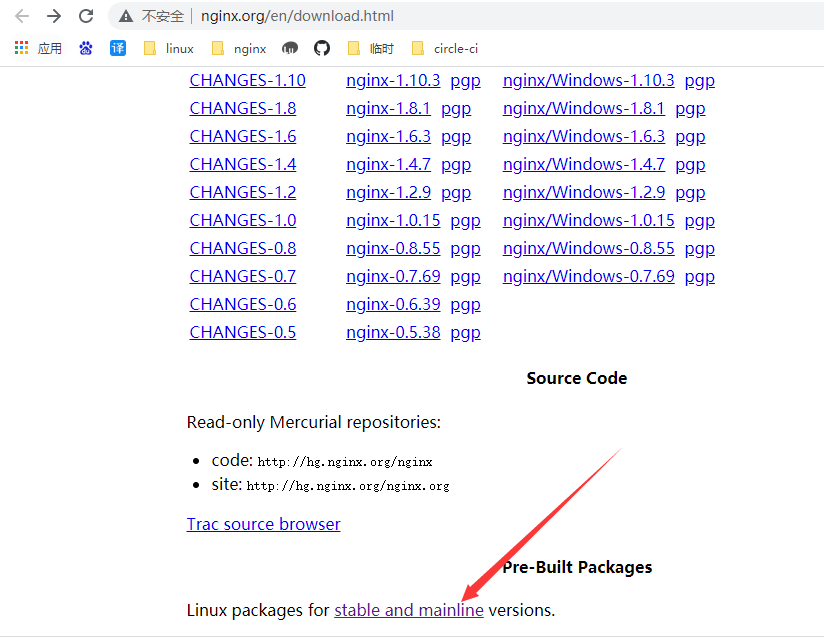
这里有各个环境安装介绍: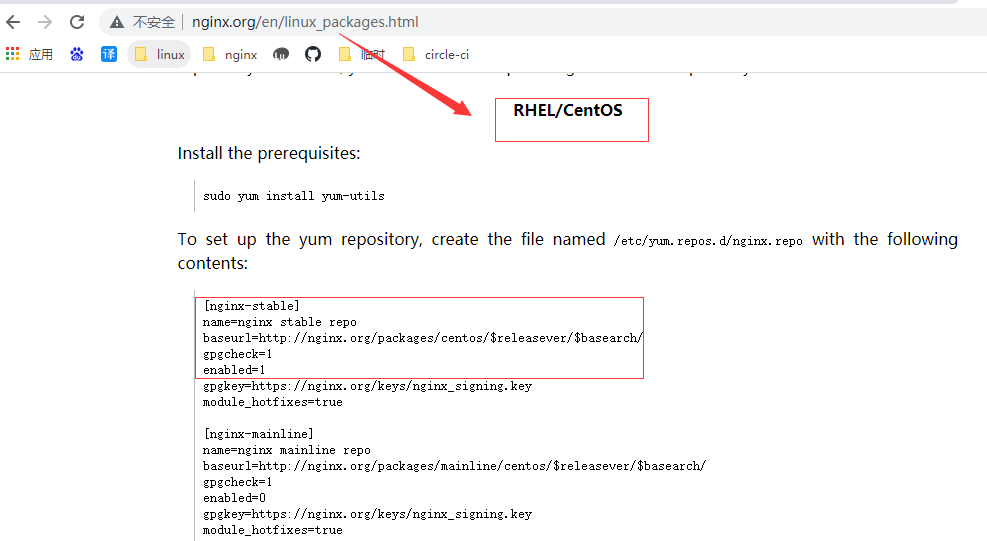
根据这个步骤,注意的是,我们不需要gpgkey,这个地方设置为0:1
2
3
4
5
6
7
8[root@localhost yum.repos.d]# cat /etc/yum.repos.d/nginx.repo
[nginx]
name=nginx repo
baseurl=http://nginx.org/packages/centos/7/$basearch/
gpgcheck=0
enabled=1
[root@localhost yum.repos.d]#
执行命令 yum list | grep nginx 查看yum 可安装的 nginx源,
图片显示,nginx安装的源就是 我们刚才配置的 nginx.repo 。
如果我们用 epel-release 这个源来安装, 那么 下图中的源 就会显示 epel。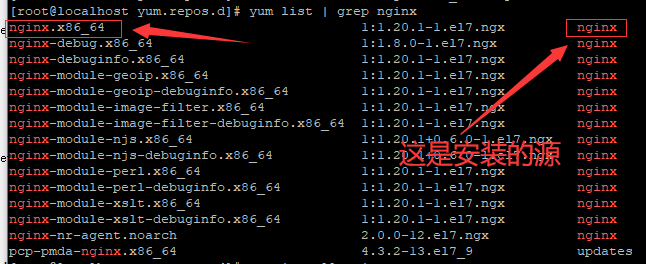
epel-release(简便)
参考《linux笔记(坎) - 安装和使用nginx》
配置文件目录介绍
1 | [root@localhost yum.repos.d]# rpm -ql nginx |
语法介绍
配置代码结构
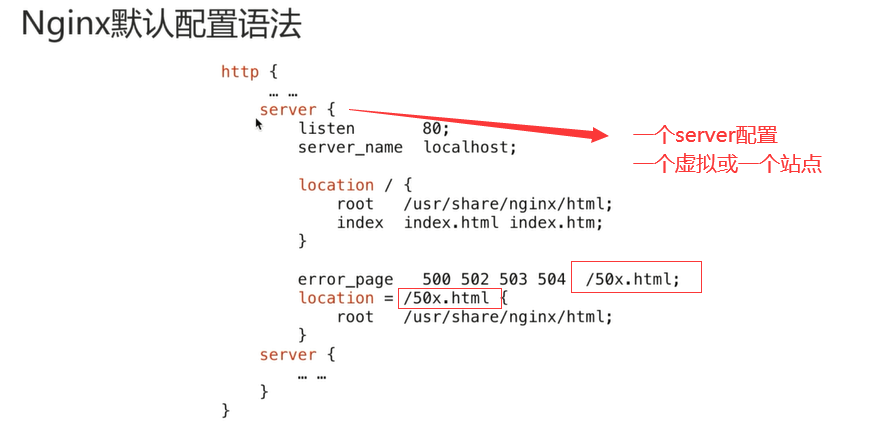
完整配置
1 | [root@localhost yum.repos.d]# cat /etc/nginx/nginx.conf |
以上值得注意的是,server相关的,都被定义到了 /etc/nginx/conf.d/default.conf 中;
配置非server的才在 /etc/nginx/nginx.conf,
然后其中再引入 /etc/nginx/conf.d/default.conf
server include的好处
这样做有个好处,每次主配置文件不用动,
若想增加server配置,只需在目录/etc/nginx/conf.d/*.conf下,增加conf文件即可,
主配置文件默认引入。
curl 命令
curl -v url
-v 可以三个信息:显示 请求、 response信息 ;
请求头 以 > 编号标识
响应头 以 < 编号标识1
2
3
4
5
6
7
8
9
10
11
12
13
14
15
16
17
18
19
20
21
22
23
24
25
26
27
28
29
30
31
32
33
34
35
36
37
38
39$ curl -v http://192.168.228.131/test
* Trying 192.168.228.131:80...
* Connected to 192.168.228.131 (192.168.228.131) port 80 (#0)
> GET /test HTTP/1.1 #请求头
> Host: 192.168.228.131
> User-Agent: curl/7.75.0
> Accept: */*
>
* Mark bundle as not supporting multiuse
< HTTP/1.1 404 Not Found #响应头
< Server: nginx/1.20.1
< Date: Sun, 27 Jun 2021 04:18:03 GMT
< Content-Type: text/html
< Content-Length: 506
< Connection: keep-alive
< ETag: "60d7c9e2-1fa"
<
<!DOCTYPE html> # response信息
<html>
<head>
<title>Error</title>
<style>
body {
width: 35em;
margin: 0 auto;
font-family: Tahoma, Verdana, Arial, sans-serif;
}
</style>
</head>
<body>
<h1>An error occurred.</h1>
<p>Sorry, the page you are looking for is currently unavailable.<br/>
P000000000000lease try again later.</p>
<p>If you are the system administrator of this resource then you should check
the error log for details.</p>
<p><em>Faithfully yours, nginx.</em></p>
</body>
</html>
* Connection #0 to host 192.168.228.131 left intact
curl url
显示 response1
2
3
4
5
6
7
8
9
10
11
12
13
14
15
16
17
18
19
20
21
22$ curl http://192.168.228.131/test
<!DOCTYPE html> # response信息
<html>
<head>
<title>Error</title>
<style>
body {
width: 35em;
margin: 0 auto;
font-family: Tahoma, Verdana, Arial, sans-serif;
}
</style>
</head>
<body>
<h1>An error occurred.</h1>
<p>Sorry, the page you are looking for is currently unavailable.<br/>
P000000000000lease try again later.</p>
<p>If you are the system administrator of this resource then you should check
the error log for details.</p>
<p><em>Faithfully yours, nginx.</em></p>
</body>
</html>
虚拟主机配置
定义
虚拟主机配置: 在同一个nginx上运行多套单独服务,这些服务是相互独立的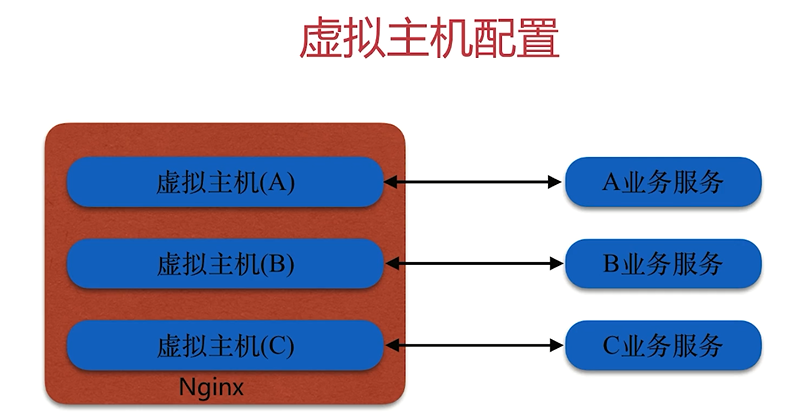
多种实现方案
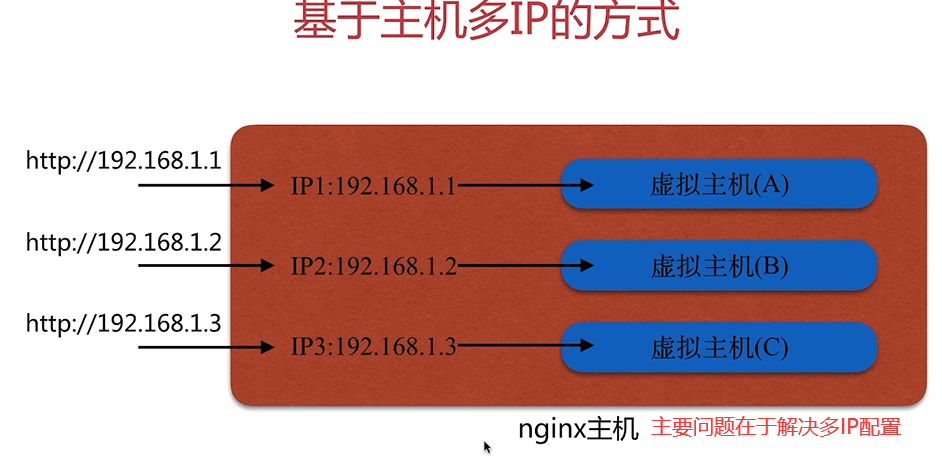
基于主机 多IP方式
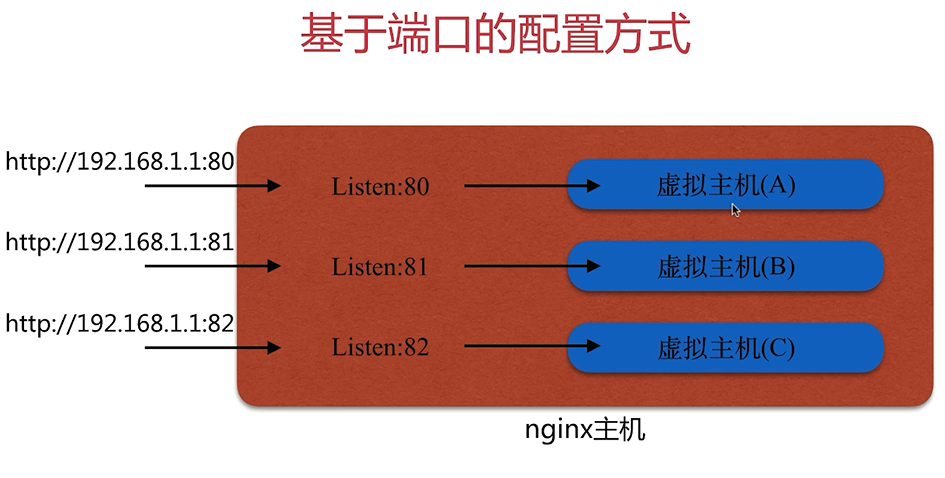
基于端口的配置方式
基于多域名方式
比较简单,不介绍了。
基于主机 多IP方式
两种实现方式
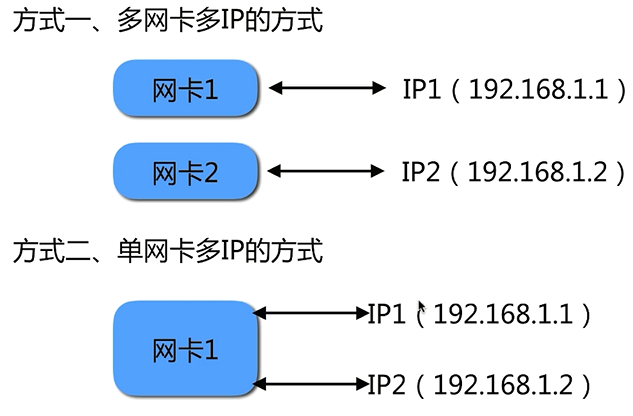
我们以 单网卡多IP讲解:
配置步骤说明
- 通过ip命令增加多个IP;
- 修改主配置文件,因为service都是通过include到主配置的,所有主配置不用动,
只需创建多个文件如:/etc/nginx/conf.d/default1.conf/etc/nginx/conf.d/default2.conf;
配置文件修改地方如下:
1 | server { |
当然你也可以修改 location的root,修改html web目录。
重启
systemctl restart nginx
配置步骤命令
具体如下:1
2
3
4
5
6
7
8
9
10
11
12
13
14
15
16
17
18
19
20
21
22
23
24
25 [root@localhost conf.d]#ip a add 192.168.228.132/24 dev ens33 #添加ip,默认我们只有一个设备,设备名为 dev
[root@localhost conf.d]#ip a add 192.168.228.133/24 dev ens33
[root@localhost conf.d]# ip a #查看
1: lo: <LOOPBACK,UP,LOWER_UP> mtu 65536 qdisc noqueue state UNKNOWN group default qlen 1000
link/loopback 00:00:00:00:00:00 brd 00:00:00:00:00:00
inet 127.0.0.1/8 scope host lo
valid_lft forever preferred_lft forever
inet6 ::1/128 scope host
valid_lft forever preferred_lft forever
2: ens33: <BROADCAST,MULTICAST,UP,LOWER_UP> mtu 1500 qdisc pfifo_fast state UP group default qlen 1000
link/ether 00:0c:29:ca:0a:50 brd ff:ff:ff:ff:ff:ff
inet 192.168.228.131/24 brd 192.168.228.255 scope global noprefixroute dynamic ens33
valid_lft 1673sec preferred_lft 1673sec
inet 192.168.228.132/24 scope global secondary ens33
valid_lft forever preferred_lft forever
inet 192.168.228.133/24 scope global secondary ens33
valid_lft forever preferred_lft forever
inet6 fe80::9efd:4c59:8c9c:6f69/64 scope link noprefixroute
valid_lft forever preferred_lft forever
#也可以通过 ping 来看看是否加号了刚才的ip
cp default.conf default1.conf #配置nginx文件
ifconfig 与 ip 命令的不同
注意到一个细节,配置好多ip后,使用 ip命令查看ip,如上节,与下面使用 ifconfig不一样:
1 | [root@localhost conf.d]# ifconfig |
nginx模块与配置demo
分类
有nginx官方模块
有第三方模块
官方模块
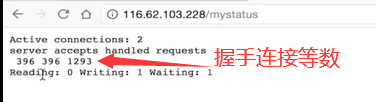
stub_status :nginx连接状态
在 server , location 中配置: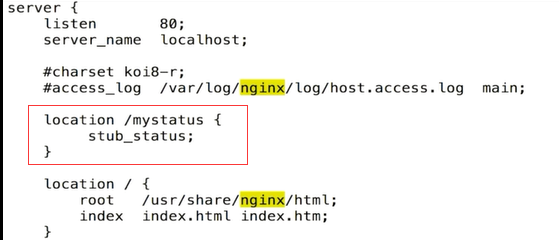
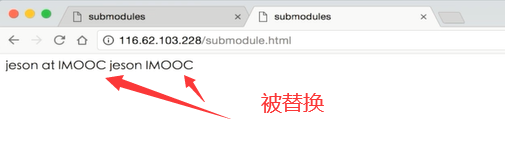
http_sub_module :替换html中的内容
参数配置 sub_filter_once on|off; 是否只匹配一次,默认是的;
context: http server location;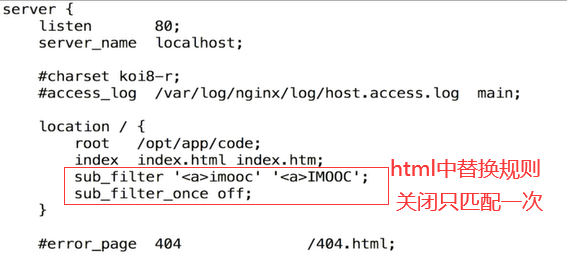
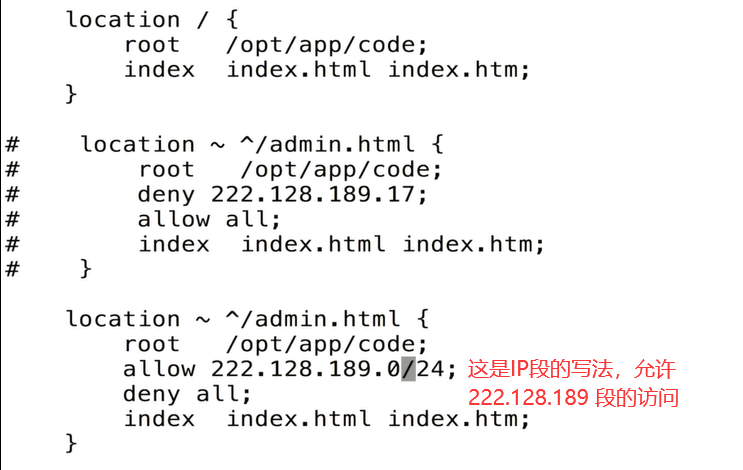
http_access_module :访问限制
语法: allow address | CIDR |unix: | all; 允许IP|IP网段如192.168.1|用的不多|所有;
IP段的写法比如:192.168.1.0/24
默认: ——
context: http, server, location, limit_except
语法: deny address | CIDR |unix: | all;
默认: ——
context: http, server, location, limit_except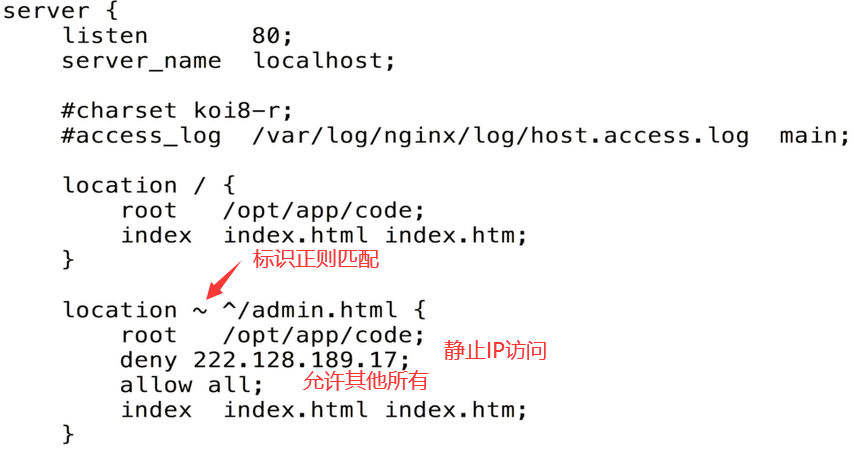
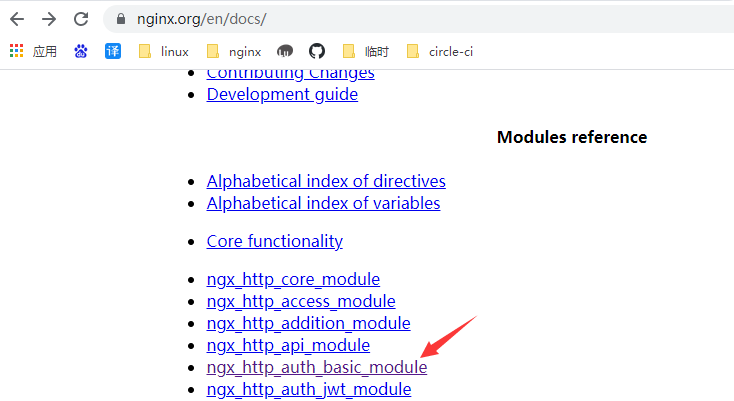
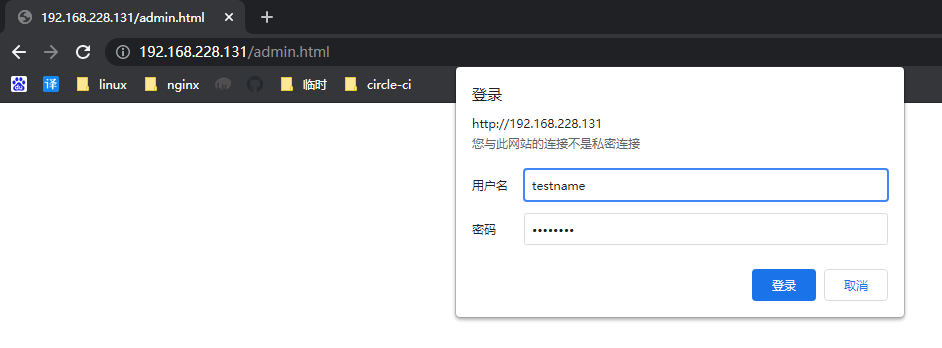
密码访问 auth_basic
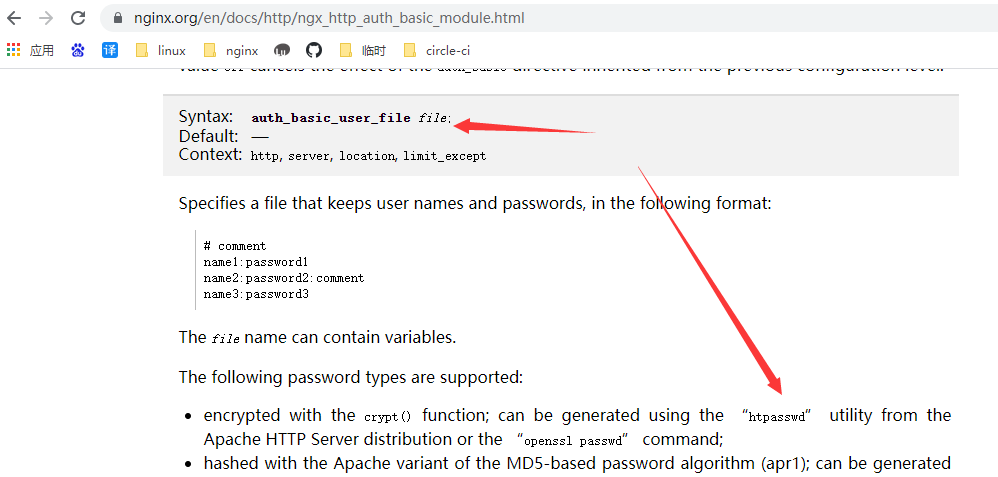
auth_basic说明
语法: auth_basic string | off;
默认: off
context: http, server, location, limit_except
语法: auth_basic_user_file file;
默认: __
context: http, server, location, limit_except
官网demo参考
htpasswd生成密码
1 | #htpasswd是上面官网上 推荐的生成密码的工具,配合nginx使用 |
1 | [root@localhost ~]# htpasswd -c /opt/backup/auth_conf testname |
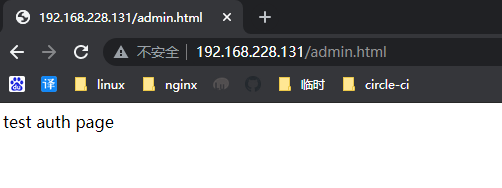
配置auth_basic
1 | [root@localhost ~]# cat /etc/nginx/conf.d/auth_test.conf |
http://192.168.228.131/admin.html
gzip 静态资源配置和demo
完整配置
1 | server { |
方案图
相关模块
文件读取: sendfile
语法: on | off
默认: off
context: http, server, location, if in location
tcp_nopush
语法: on | off
默认: off
context: http, server, location
tcp_nopush 是否急需发送;
如果是off,标识 等有一定传输时,才集中传输;
大文件传输 推荐 打开;
需要开启 sendfile on;
tcp_nodelay
语法: on | off
默认: on
context: http, server, location
tcp_nodelay与 tcp_nopush 相反,表示立即发送;
需要开启 keeplive;
文件压缩: gzip
语法: on | off
默认: on
context: http, server, location
原理如下,浏览器解压gzip, nginx 压缩文件为gzip;
好处是 减少了 服务器带宽,文件变小传输更快;
相关模块有:
gzip_comp_level 2; 压缩比
gzip_http_version 1.1 主流使用1.1压缩版本;
小结
gzip对压缩txt js html 文件压缩比达到几倍到几十倍,通过网络也能看到gzip的大文件渲染更快,非常推荐使用gzip;
弊端 gzip 会让文件同时存在 原文件以及gzip文件两份,对服务器磁盘有多占用的不好。
其他demo
代理配置demo
访问80端口 带有new关键字的请求,都转发到 8080 端口。
主要代码
1 | server { |
浏览器范围:
http://192.168.1.159/new/down.html 会被代理到 8080 端口。
代理缓存的demo说明
概述
1 | #配置两个服务器,会达到这样的效果: nginx为了负载均衡,让多个请求会平均的分配到每个服务器中,保证每个服务器接收到的请求数量一致; |
服务端清除代理缓存
cd /opt/app/cache 上面定义的缓存目录下,将里面的文件全部删除
websocket 代理
概念

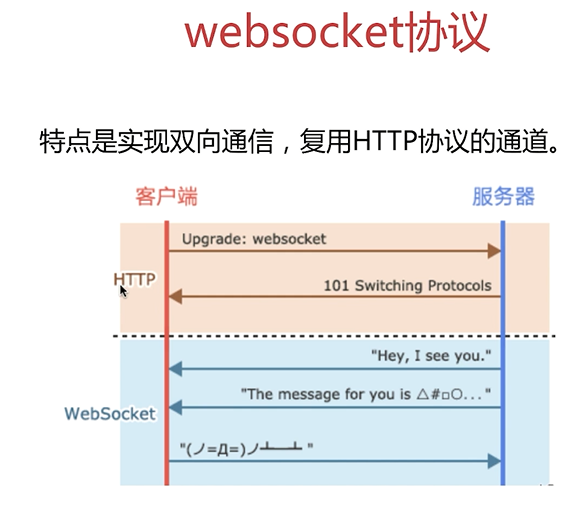
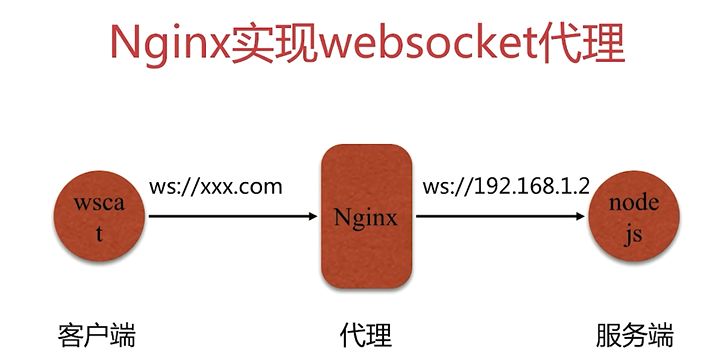
实现
因为全程都是在服务器端,因此都是用127.0.0.1。1
2
3
4
5
6
7
8
9
10
11
12
13
14
15
16
17
18
19
20
21
22#如果 $http_upgrade 有值, 就给$connection_upgrade设置值;
#$connection_upgrade默认 为 upgrade;
#如果 $http_upgrade 为'',则 $connection_upgrade 值为 close;
map $http_upgrade $connection_upgrade {
default upgrade;
'' close;
}
upstream websocket {
server 127.0.0.1:8010; #node 启动的服务
}
server {
listen 8020;
location / {
proxy_pass http://websocket;
proxy_http_version 1.1;
proxy_set_header Upgrade $http_upgrade; #这是配置 ws 代理转发的关键
proxy_set_header Connection $connection_upgrade; #这是配置 ws 代理转发的关键
}
}
1 | 这是node js 文件 |
测试
1 | #在服务端中的终端执行 |

uwsgi代理与djiango
Django 是一个开源的web的框架;
Python下有许多款不同的 Web 框架。Django是重量级选手中最有代表性的一位。许多成功的网站和APP都基于Django。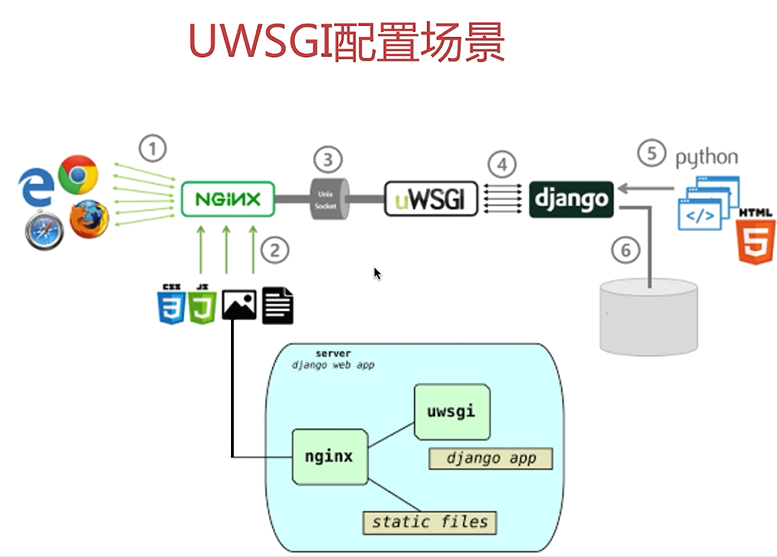
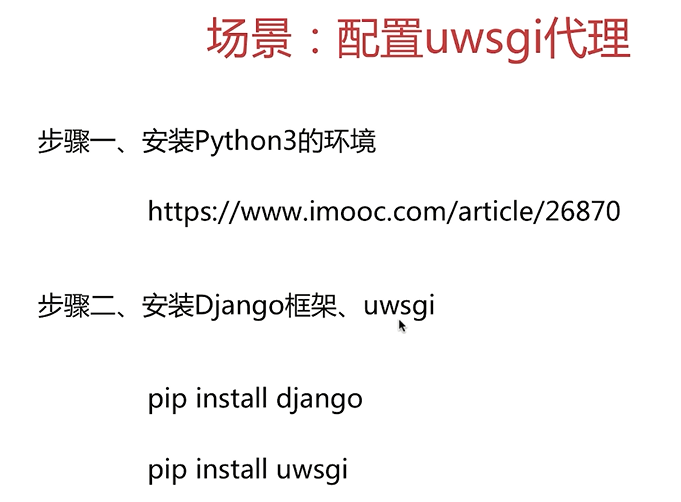
安装Python等参考
rewrite的使用和demo
配置语法
1 | rewrite regex replacement [flag]; |
flag
对rewrite regex replacement [flag];中flag取值说明。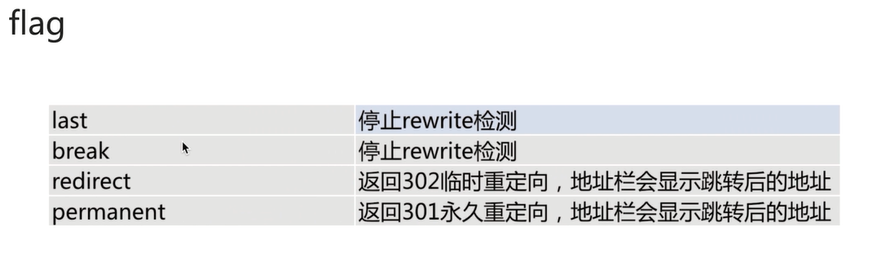
代码
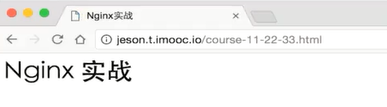
1 | server { |
last break 区别
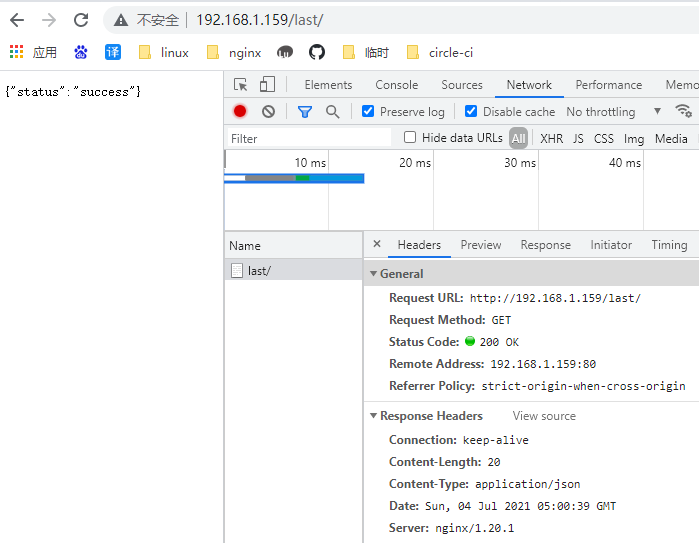
如上的demo。注意的是last的状态码是200,不是30x.
break妙用
如下服务端静态文件目录 与 break结合使用。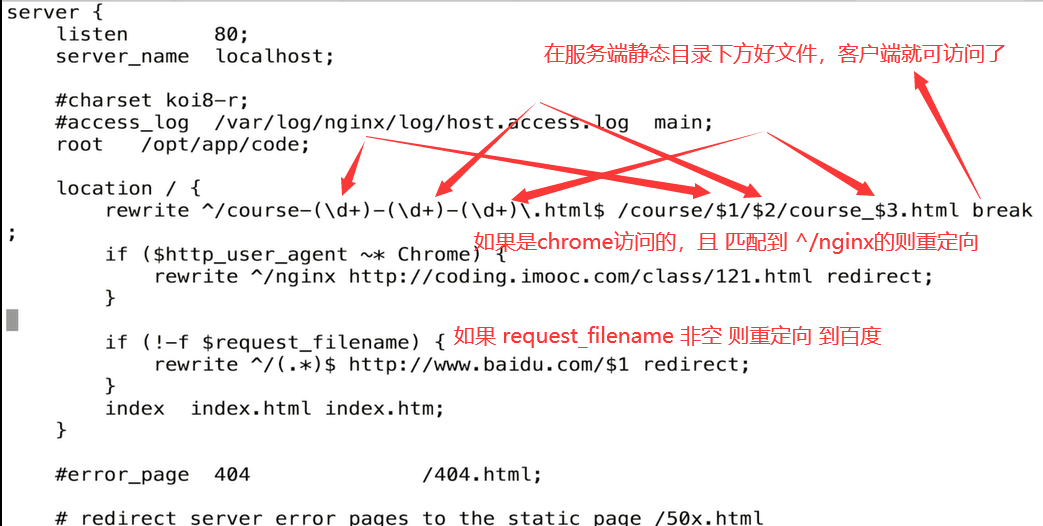
黑知识
ifconfig 与 ip 命令的不同
参考上面《ifconfig 与 ip 命令的不同》
检测 nginx语法是否正确
1 | [root@localhost ~]# nginx -tc /etc/nginx/nginx.conf |
注意的是,对于 被 主配置文件/etc/nginx/nginx.conf include的 defaultxxx.conf 等文件,检查其语法是否正确都是通过 ,检查其主配置文件:nginx -tc /etc/nginx/nginx.conf.
只要主配置文件检查通过,说明被include的所有conf文件都正常语法。
此外也可以通过重启 systemctl restart nginx 根据提示,可以查看相关的语法错误提示:
systemctl status nginx.service | grep static.conf
IP网段写法
语法: allow address | CIDR |unix: | all; 允许IP|IP网段如192.168.1|用的不多|所有;
IP段的写法比如:192.168.1.0/24
配置语法
一定要注意加空格
在nginx中,配置时一定要注意加上空格,
比如if语句:1
2
3
4#错误
if(){
}
1 | #加了空格,正确 |
location匹配优先级
几种优先级
= 进行普通字符精确匹配,也就是完全匹配; –优先级最高;
^~ 表示普通字符匹配,使用前缀匹配,也就是以什么开头; –优先级次之;
~ 或 ~* 都是正则匹配, 前者区分大小写, 后缀不区分大小写; –优先级次之;


demo说明

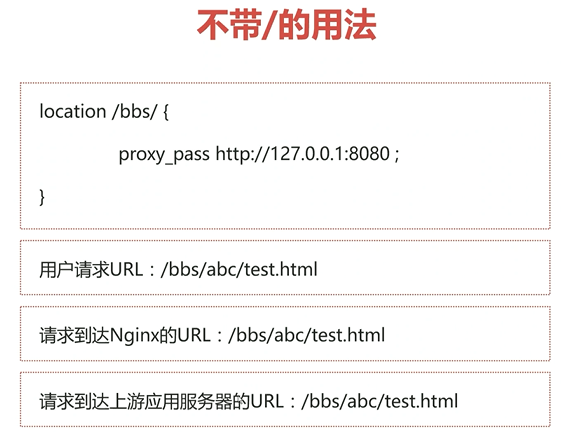
url结尾的反斜线
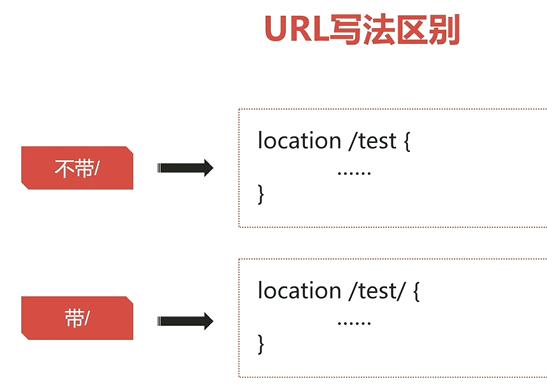
不带:
location /test :
- 首先 先尝试把/test 当成一个目录,去找 /test目录下的 index.html, 有就返回index.html,
- 如果没有index.html, 就把/test 当成一个文件处理,看是否存在 test 文件,如果存在就返回text文件;
location /test/ : 去找 /test/目录下的 index.html, 有就返回index.html, 如果没有index.html, 就返回404;
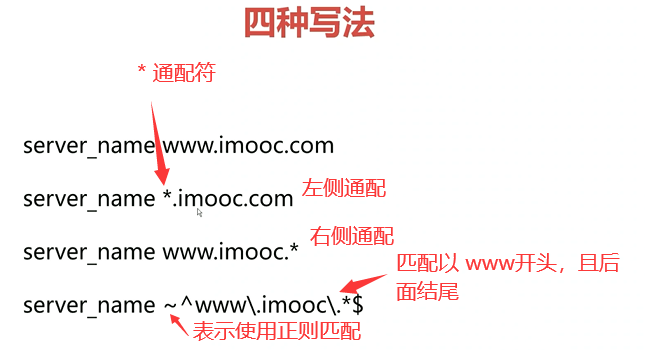
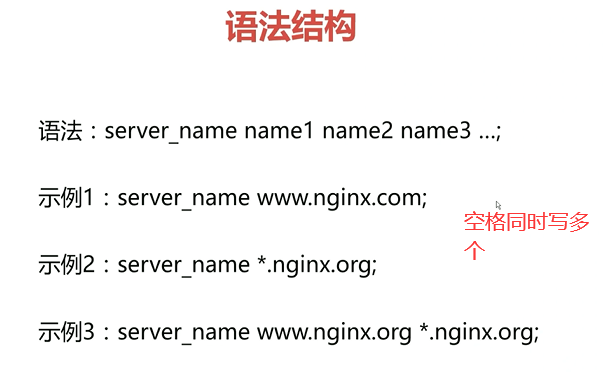
server_name 写法 和 形式
四种写法
匹配优先级

四种结构
几种优先级
= 进行普通字符精确匹配,也就是完全匹配; –优先级最高;
^~ 表示普通字符匹配,使用前缀匹配,也就是以什么开头; –优先级次之;
~ 或 ~* 都是正则匹配, 前者区分大小写, 后缀不区分大小写; –优先级次之;
demo说明
服务端处理客户端请求流程
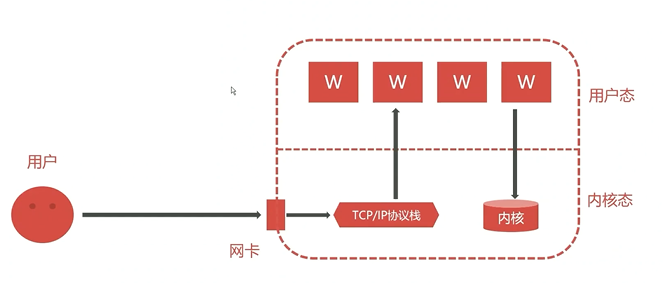
用户
发送一个tcp链接
到我们的网卡上网卡收到之后
把这个tcp链接拆包,
此时拆包出来第二层信息,
拆包后,就把这个包含第二层信息的数据包
给我们的tcp/ip 协议栈我们的tcp/ip 协议栈 把这个包含第二层信息的数据包给拆掉之后
发现一些三层信息
比如
是不是当前的ip,如果不是就直接将这个数据包丢掉,停止处理;
如果是就继续处理;
我们的tcp/ip协议继续拆包数据包
这样就拆出来第四层信息,
看下端口是谁,比如是80端口服务
这个时候,我们的内核态会知道我们的80端口 到底监听在用户态的某一个程序中,
比如nginx提供的服务;此时,tcp/ip协议栈 就把数据包传递给 nginx的worker子进程,交给nginx处理。
看日志的妙处
nginx 看日志,可以打印 变量名称,可以这样说,前端调试,日志是打开控制台
1 | # 在主配置文件 /etc/nginx/nginx.conf 中 |
在控制台执行命令:1
tail -f /var/log/nginx/access.log
每次访问nginx,就会显示上面的日志信息。
include 用法
1 | location / { |
相当于:
定义一个文件:1
2
3
4
5
6
7
8$ cat proxy_params
proxy_redirect default;
proxy_set_header Host $http_host;
proxy_set_header X-Real-IP $remote_addr;
proxy_connect_timeout 30;
proxy_send_timeout 60;
proxy_read_timeout 60;
1 | location / { |
这样做的好处就是模块化,方便引用,可读性好。
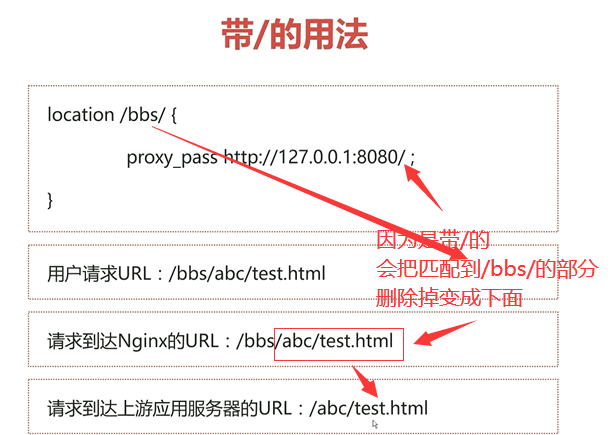
你不知道的 proxy_pass
不带/ 和 带/ 的区别
其他
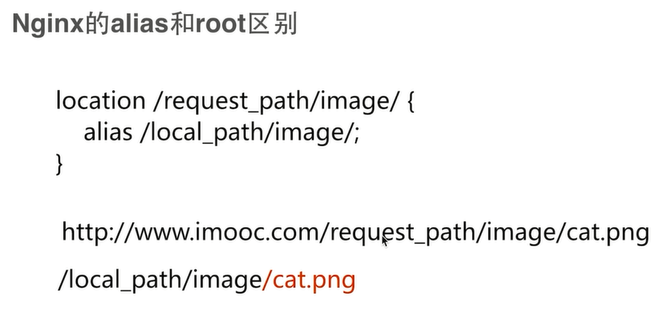
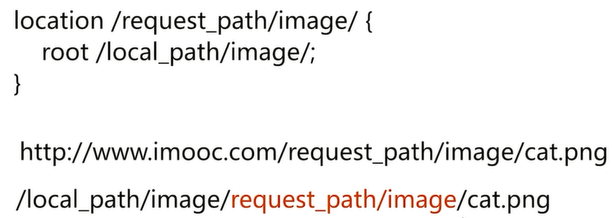
root 与 alias区别
传递用户的真实IP地址

匹配所有路径的 正则
1 | rewrite ^(.*)$ /pages/maintain.html break; # ^(.*)$匹配所有路径 |
关闭nginx的方法
1 | [root@localhost ~]# ps -aux | grep nginx |
restart nginx报错时处理方式
有时候nginx语法是正确的;
端口也没有被占用;
systemctl restart nginx 依然报错,此时可以关闭nginx,然后再重启。
md5加密生成下载链接的sh脚本
$() 的妙用,$()括号内,可写sh表达式:1
2
3
4
5
6
7
8
9
10
11
12
13
14
15
16
17
[root@localhost test]# cat md.sh

#!/bin/sh
#
servername="jeson.t.com"
download_file="/opt/app/"
time_num=$( date -d "2021-10-18 00:00:00" +%s )  #$() 的妙用
secret_num="imooc"

# echo的输出相当于 openssl 需要的目录, 先进行 md5加密,后base64,再后面就是一些格式花处理
res=$(echo -n "${time_num}${download_file} ${secret_num}"|openssl md5 -binary | openssl base64 | tr +/ -_ | tr -d =)

echo "http://${servername}${download_file}?md5=${res}$&expires=${time_num}"
[root@localhost test]# sh ./md.sh
http://jeson.t.com/opt/app/?md5=kyo5J6MRVm1l-Rvjt9rzWw$&expires=1634529600
[root@localhost test]#
安装openssl指定版本的sh脚本

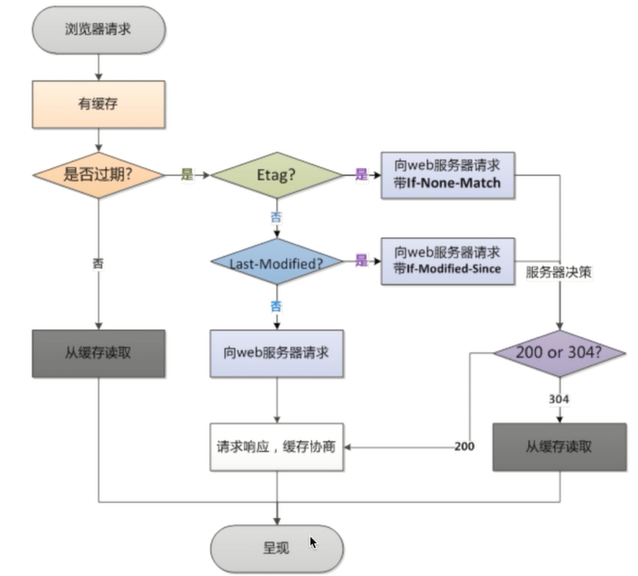
浏览器缓存与nginx
浏览器缓存原理
安全相关
文件上传漏洞
文件上传漏洞-利用这些可以上传的接口将恶意代码植入到服务器中,再通过url去访问以执行代码。
http://www.imooc.com/upload/1.jpg/1.php
nginx将1.jpg作为php代码执行。
如果1.jpg 包含了php不好的代码,就会污染了服务器。
解决之道,在于nginx内,识别url是否合规,并做相应返回:1
2
3
4
5
6location ^~ /upload {
root /opt/app/images;
if($request_filename ~* (.*)\.php){
return 403 #如果是php格式,就不要给显示或下载图片
}
}
sql注入
sql注入 利用未过滤未审核用户输入的攻击方法,让应用运行本不应该运行的sql代码。
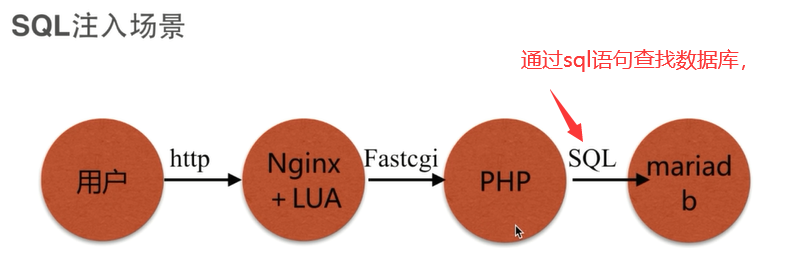
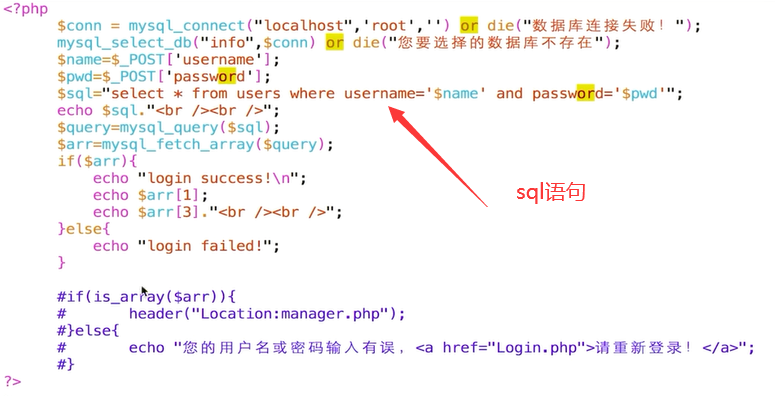
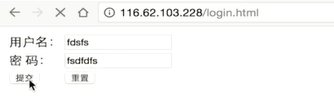
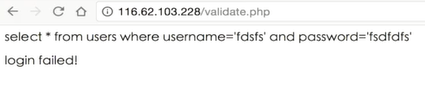

当通过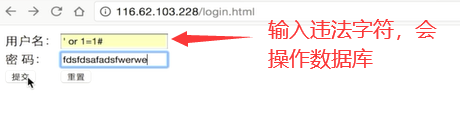
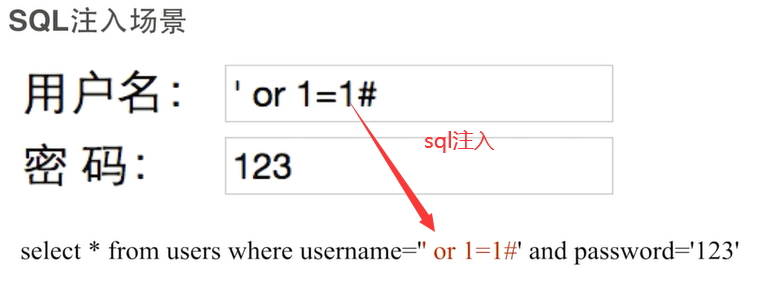
发现也登录成功了。