docker

dock 表示码头,docker是 码头工人的意思
docker 是一个容器(container)引擎

容器和虚拟机的区别

如下图,其中 app a 好比虚拟机centos中 yum install 各种软件 如httpd, squid

还可以参考Docker与VM虚拟机的区别以及Docker的特点
还可以参考docker容器与虚拟机有什么区别?

版本

docker 企业版是收费的
docker-ce 是社区版,免费的,一般用 docker-ce社区版。

centos的docker安装和使用

安装

下面安装步骤和使用全部参考官网

1
2
3
4
5
sudo yum install -y yum-utils
#设置稳定仓库
sudo yum-config-manager \
--add-repo \
https://download.docker.com/linux/centos/docker-ce.repo

1
yum install docker-ce docker-ce-cli containerd.io  #docker-ce是免费版本

至此安装完毕

使用一: hello-world

安装好后,直接看文档这里

使用二:安装和使用centos

涉及到比较多,单独列出说明:《安装和使用centos》

异常处理

1
2
3
4
[root@localhost ~]# docker run -it centos bash
Unable to find image 'centos:latest' locally
docker: Error response from daemon: Get https://registry-1.docker.io/v2/: net/http: request canceled while waiting for connection (Client.Timeout exceeded while awaiting headers).
See 'docker run --help'.

如果遇到这样的异常,请多尝试几次

安装和使用centos

安装和使用

docker run -it centos bash 这个命令是使用docker进入 centos 的bash终端;
docker会首先从本地查看是否有centos,如果无,就会自动安装centos;
然后进入centos 的bash终端

1
2
3
4
5
6
7
8
9
10
11
12
13
14
15
16
17
18
19
20
21
[root@localhost ~]# docker run -it centos bash
Unable to find image 'centos:latest' locally
latest: Pulling from library/centos
7a0437f04f83: Pull complete
Digest: sha256:5528e8b1b1719d34604c87e11dcd1c0a20bedf46e83b5632cdeac91b8c04efc1
Status: Downloaded newer image for centos:latest
#注意这里以及变成root@30c93c21d6d0 与上一步centos主机root@localhost
#这说明安装完后,默认进入centos终端,且使用root用户
[root@30c93c21d6d0 /]# ls
bin dev etc home lib lib64 lost+found media mnt opt proc root run sbin srv sys tmp usr var
[root@30c93c21d6d0 /]# pwd
/
[root@30c93c21d6d0 /]# exit 退出docker centos系统,进入主机centos系统终端
exit
[root@localhost ~]# pwd
/root
#退出docker centos系统后,仍然可以使用docker使用docker centos系统内的可运行程序,
#比如 docker centos系统内的echo 程序输出语句
[root@localhost ~]# docker run -it centos /bin/echo "hollo docker.."
hollo docker..
[root@localhost ~]#

退出docker centos系统后仍可使用

退出docker centos系统后,仍然可以使用docker使用docker centos系统内的可运行程序,见上面《安装和使用》的命令行

其他介绍

1
2
3
4
5
6
7
8
9
10
11
12
13
14
15
16
17
18
19
20
21
22
23
24
25
26
27
[root@localhost ~]# docker images  #docker安装的镜像
REPOSITORY TAG IMAGE ID CREATED SIZE
hello-world latest d1165f221234 3 months ago 13.3kB
centos latest 300e315adb2f 6 months ago 209MB
[root@localhost ~]# docker ps #docker目前在运行的进程,下面显示是没有
CONTAINER ID IMAGE COMMAND CREATED STATUS PORTS NAMES
[root@localhost ~]# docker ps -a #-a表示docker刚才运行的进程
CONTAINER ID IMAGE COMMAND CREATED STATUS PORTS NAMES
fdc92c41c363 centos "/bin/echo 'hollo do…" 8 minutes ago Exited (0) 7 minutes ago optimistic_volhard
30c93c21d6d0 centos "bash" 16 minutes ago Exited (0) 15 minutes ago busy_jang
889899077b9c hello-world "/hello" 32 minutes ago Exited (0) 32 minutes ago clever_dirac
[root@localhost ~]# docker ps --help

Usage: docker ps [OPTIONS]

List containers

Options:
-a, --all Show all containers (default shows just running)
-f, --filter filter Filter output based on conditions provided
--format string Pretty-print containers using a Go template
-n, --last int Show n last created containers (includes all states) (default -1)
-l, --latest Show the latest created container (includes all states)
--no-trunc Don't truncate output
-q, --quiet Only display container IDs
-s, --size Display total file sizes
[root@localhost ~]#
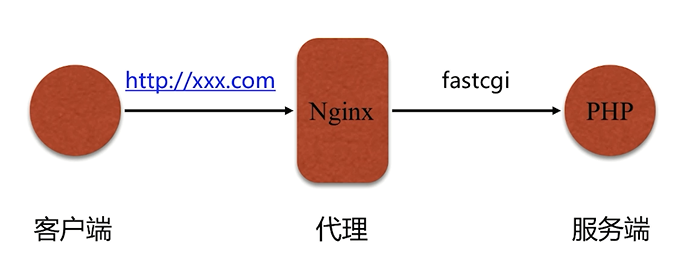
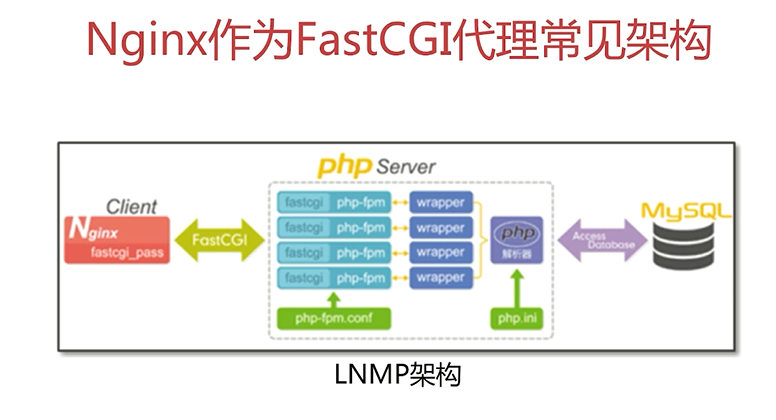
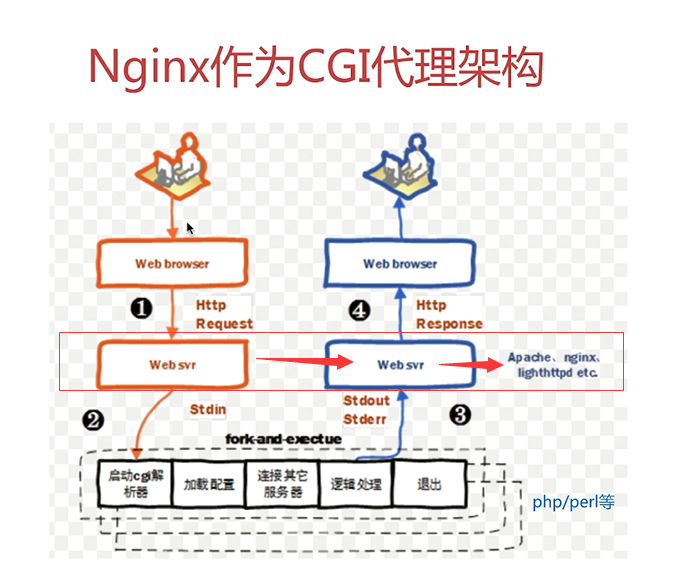
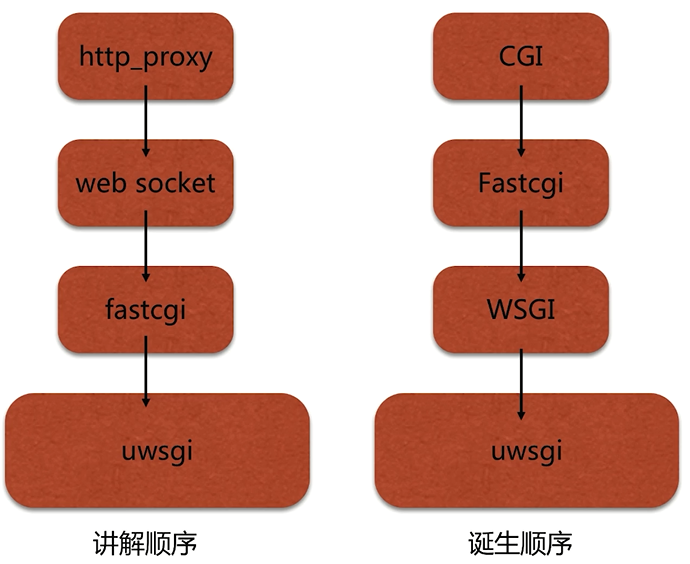
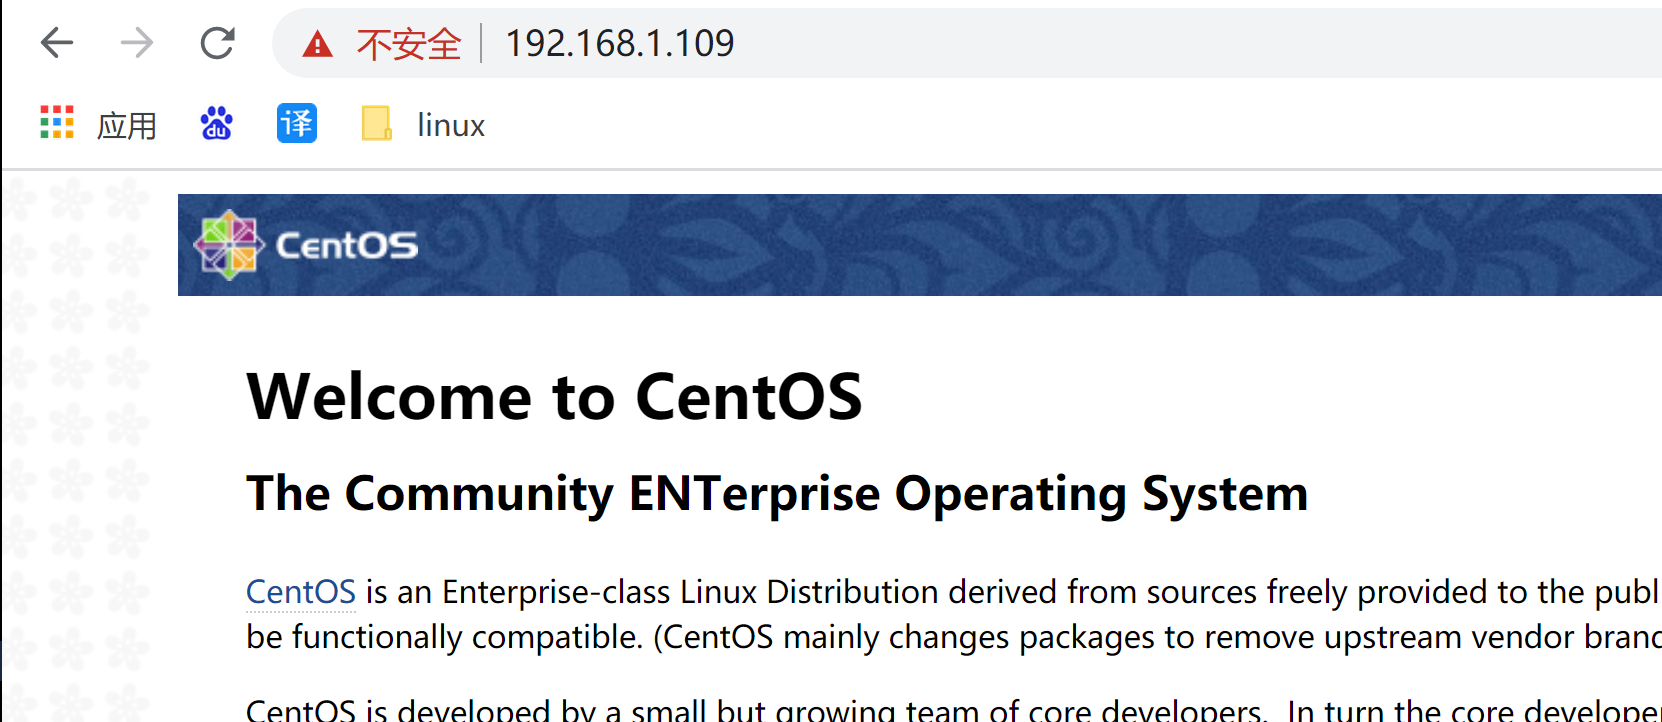
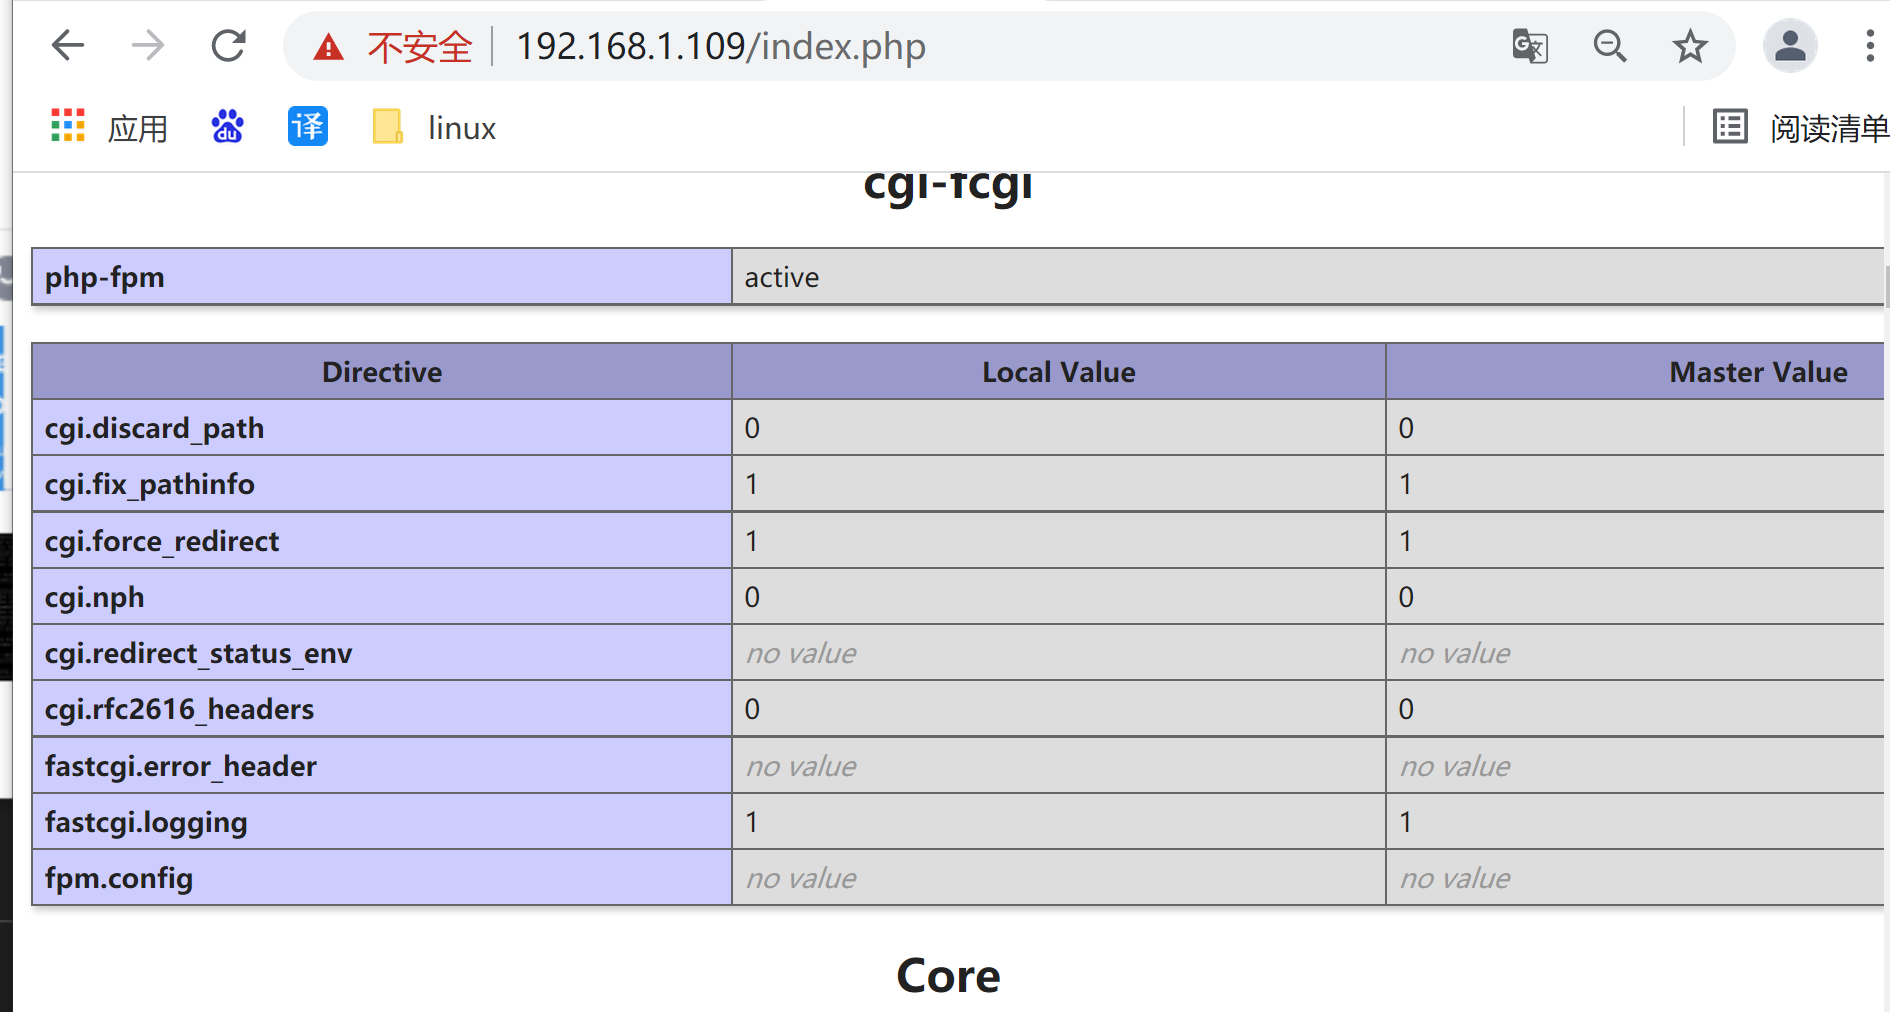
LNMP架构安装使用

LNMP架构介绍

LNMP架构 : Linux + nginx + mysql + (mariaDB) + php 的开发架构
类似的有LAMP架构:
LAMP架构 : Linux + apache + mysql + (mariaDB) + php 的开发架构

php 与 apache 天生就搭配,但 nginx与php通讯必须要安装 FastCGI协议;

Discuz! 一个国内的论坛 BBS 软件系统

认识FastCGI

架构示意图

FastCGI是相对于早期的 CGI说的

下面是早期的 CGI架构,因为有某些不足,因此就有了上面的 fastCGI.

延申讲解- uwsgi

FastCGI协议 与 php-fpm

FastCGI协议是可以让nginx与php进行通讯的一个协议
php-fpm就是一个这样的协议:

php-fpm

介绍

表示 FastCGI 进程管理器
默认监听9000端口

安装

1
2
3
4
5
6
7
8
9
10
11
12
13
14
15
16
17
18
19
20
[root@localhost ~]# yum install php-fpm
Loaded plugins: fastestmirror
Loading mirror speeds from cached hostfile
* base: mirrors.ustc.edu.cn
* epel: mirrors.thzhost.com
* extras: mirrors.ustc.edu.cn
* updates: mirrors.ustc.edu.cn
* webtatic: us-east.repo.webtatic.com
Resolving Dependencies
--> Running transaction check
---> Package php-fpm.x86_64 0:5.4.16-48.el7 will be installed
--> Processing Dependency: php-common(x86-64) = 5.4.16-48.el7 for package: php-fpm-5.4.16-48.el7.x86_64
--> Running transaction check
---> Package php-common.x86_64 0:5.4.16-48.el7 will be installed
--> Processing Conflict: php56w-common-5.6.40-1.w7.x86_64 conflicts php-common < 5.6
--> Finished Dependency Resolution
#因为之前升级了php版本到 php56,与php-fpm 冲突
Error: php56w-common conflicts with php-common-5.4.16-48.el7.x86_64
You could try using --skip-broken to work around the problem
You could try running: rpm -Va --nofiles --nodigest

安装异常

如上因为之前升级了php版本到 php56,与php-fpm 冲突,
既然这样,就不安装 php-fpm,安装 php56w-fpm

解决之道

当然你也可以卸载php56,安装php低版本,不过不太好,直接安装php56w-fpm

1
2
3
4
5
[root@localhost ~]# yum install php-fpm
#安装完后,会发现nginx目录下下多了下面文件
[root@localhost ~]# ls /etc/nginx/
fastcgi.conf.default uwsgi_params fastcgi_params uwsgi_params.default
...

安装完后继续使用 php-fpm

虽然安装的是php56w-fpm,但安装好后,使用时,请使用php-fpm

1
2
systemctl start php-fpm
systemctl enable php-fpm

配置nginx和php通讯

配置

1
2
3
4
5
6
7
8
9
10
11
12
13
14
vim /etc/nginx/nginx.conf

location / {
index index.html index.htm index.php; #网页的文件可以是这几种类型;
}

#再次写个location,用来解析php文件, ~表示使用正则表达式, 凡是匹配到php的文件时
location ~ \.php$ {
fastcgi_pass 127.0.0.1:9000; #匹配到php文件是,传递给fastcgi,9000是fastcgi默认端口
fastcgi_index index.php;
#$document_root 代表配置文件中server模块下的root : /usr/share/nginx/html;
fastcgi_param SCRIPT_FILENAME $document_root$fastcgi_script_name;
include fastcgi_params;
}

访问页面

https://192.168.1.109/

https://192.168.1.109/index.php
显示下面文件,说明 php与nginx通讯正常了:

调试技巧

nginx -t 可以调试配置文件 /etc/nginx/nginx.conf 哪里哪一行出错,语法出错。

完整配置

1
2
3
4
5
6
7
8
9
10
11
12
13
14
15
16
17
18
19
20
21
22
23
24
25
26
27
28
29
30
31
32
33
34
35
36
37
38
39
40
41
42
43
44
45
46
47
48
49
50
51
52
53
54
55
56
57
58
59
60
61
62
63
64
65
66
67
68
69
70
71
72
73
74
75
76
77
78
79
80
81
82
83
84
85
86
87
88
89
90
91
92
93
94
95
96
97
98
99
100
101
102
103
104
105
106
107
108
109
110
111
112
113
[root@localhost html]# cat /etc/nginx/nginx.conf
# For more information on configuration, see:
# * Official English Documentation: http://nginx.org/en/docs/
# * Official Russian Documentation: http://nginx.org/ru/docs/

user nginx;
worker_processes auto;
error_log /var/log/nginx/error.log;
pid /run/nginx.pid;

# Load dynamic modules. See /usr/share/doc/nginx/README.dynamic.
include /usr/share/nginx/modules/*.conf;

events {
worker_connections 1024;
}

http {
log_format main '$remote_addr - $remote_user [$time_local] "$request" '
'$status $body_bytes_sent "$http_referer" '
'"$http_user_agent" "$http_x_forwarded_for"';

access_log /var/log/nginx/access.log main;

sendfile on;
tcp_nopush on;
tcp_nodelay on;
keepalive_timeout 65;
types_hash_max_size 2048;

include /etc/nginx/mime.types;
default_type application/octet-stream;

# Load modular configuration files from the /etc/nginx/conf.d directory.
# See http://nginx.org/en/docs/ngx_core_module.html#include
# for more information.
include /etc/nginx/conf.d/*.conf;

# upstream backend-apache {
# server 127.0.0.1:7080;
# }
#upstream backend-jenkins {
# server 127.0.0.1:8080;
# }

server {
listen 80 default_server;
listen [::]:80 default_server;
server_name _;
root /usr/share/nginx/html;

# Load configuration files for the default server block.
include /etc/nginx/default.d/*.conf;

#location / {
# }

return 301 https://$host$request_uri;
error_page 404 /404.html;
location = /404.html {
}
error_page 500 502 503 504 /50x.html;
location = /50x.html {
}
}

# Settings for a TLS enabled server.
#
server {
listen 443 ssl http2 default_server;
listen [::]:443 ssl http2 default_server;
server_name _;
root /usr/share/nginx/html;

ssl_certificate "/etc/nginx/pki/server.crt";
ssl_certificate_key "/etc/nginx/pki/server.key";
ssl_session_cache shared:SSL:1m;
ssl_session_timeout 10m;
ssl_ciphers HIGH:!aNULL:!MD5;
ssl_prefer_server_ciphers on;
# Load configuration files for the default server block.
include /etc/nginx/default.d/*.conf;

# location / {
# proxy_pass http://backend-apache;
# }

#location /jenkins {
# proxy_pass http://backend-jenkins;
#}

location / {
index index.html index.htm index.php;
}
location ~ \.php$ {
fastcgi_pass 127.0.0.1:9000;
fastcgi_index index.php;
fastcgi_param SCRIPT_FILENAME $document_root$fastcgi_script_name;
include fastcgi_params;
}

error_page 404 /404.html;
location = /404.html {
}

error_page 500 502 503 504 /50x.html;
location = /50x.html {
}
}

}

[root@localhost html]#

Discuz论坛搭建(LNMP架构的实践)

参考官网安装

Discuz论坛 就是基于LNMP架构
Linux + nginx + mysql + (mariaDB) + php 的开发架构

安装教程参考 Discuz官网
任意电脑下下载安装包:
进入首页


执行命令

1
$ scp Discuz_X3.4_SC_UTF8_20210520.zip root@192.168.1.109:/usr/share/nginx/html  这是nginx文档目录

在服务端执行以下命令

1
2
3
4
5
6
7
8
9
10
11
12
13
 cd /usr/share/nginx/html/
unzip Discuz_X3.4_SC_UTF8_20210520.zip
[root@localhost html]# ls
readme upload utility ... 解压后多出这几个文件
[root@localhost html]# rm -rf 404.html 50x.html index.html index.php 删除无用文件
[root@localhost html]# mv upload/* . 将解压出来的 upload 内文件,移到到本目录
[root@localhost html]# ls
#有install文件夹,就是后面要访问的
admin.php config en-US home.php install misc.php poweredby.png robots.txt template utility
api connect.php favicon.ico icons LICENSE nginx-logo.png qqqun.png search.php uc_client
api.php crossdomain.xml forum.php img m plugin.php readme source uc_server
archiver data group.php index.php member.php portal.php readme.html static upload
[root@localhost html]# chmod -Rf 777 . 设置权限为777 可读写

使用Discuz自带的页面安装程序 install

页面访问 https://192.168.1.109/install

不可读写的问题

是权限的问题

解决方法一(不推荐,此方法可能导致开机异常):

1
2
semanage fcontext -a -t httpd_sys_rw_content_t "(/.*)?"
restorecon -Rv .

终极解决方法(推荐):

1
semanage 0

再次刷新页面:

点击下一步

1
[root@localhost html]# mysql -u root -p  #下图中的root就是根据你自己安装在centos上的mysql来的

发帖

管理中心

以后每次只需要通过 https://192.168.1.109/ 即可访问

救援模式

由于上面配置Discuz时 修改了上下文 semanage fcontext -a -t httpd_sys_rw_content_t "(/.*)?"
导致了开机服务器 centos时,安全验证的问题,无法开机,因此要进入救援模式,关闭 selinux,重启机器.


通过编辑 /etc/selinux/config 目录,可以永久关闭seLinux;
因为setenforce 0 是暂时关闭。

然后执行命令
exit 退出
reboot 重启就好了