
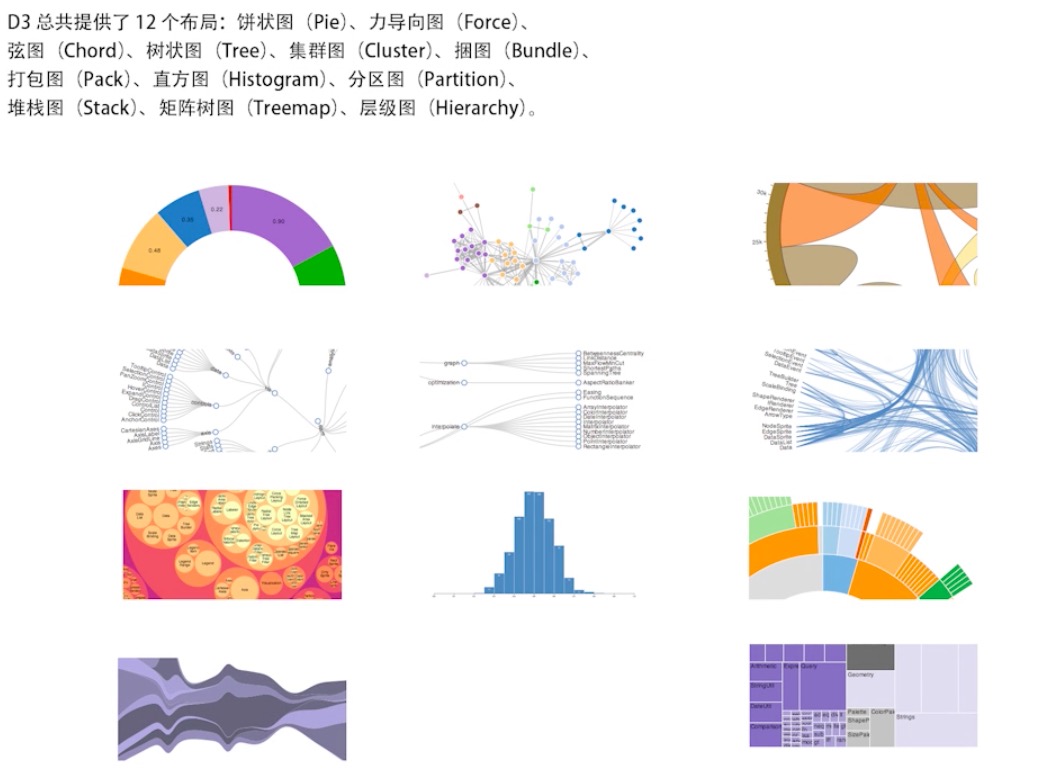
d3图形图解
树图
树图布局API
d3.layout.tree() 创建一个树图布局
tree.size([]) 设置相邻节点间隔
tree.separation([separation]) 设置相邻节点间隔
tree.nodes(root) 根据root 计算获取节点数组
tree.links(nodes) 根据nodes 计算获取连线数组
节点对象(nodes)
parent 父节点
children 子节点
depth 节点深度
x 节点x坐标
y 节点y坐标
连线(links)
source 前端节点
target 后端节点
实现步骤
设置svg 宽高,添加g,设置位置
生成树状布局,设置尺寸
对角线生成器
请求数据
- 获取nodes节点数组和link连接线数组
- 生成连线
- 生成节点
- 给节点添加圆圈,设置半径
- 给节点添加文本、设置文本的样式 位置
实现
下面代码都基于以下代码:1
2
3
4var svg = d3.select("body")
.append('svg')
.attr('width', 800)
.attr('height', 800);
以上是d3常用写法,下面示例皆以此为基础展开:
树图demo
概述
上面《树图》介绍的,在这个demo上都有体现。
效果: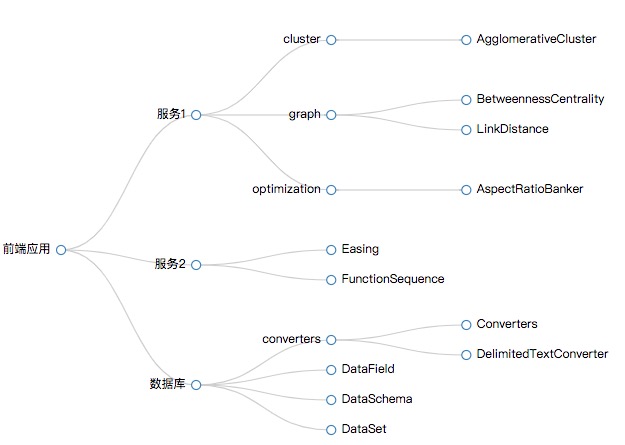
1 | var nodes = tree.nodes(root), |
转换坐标
1 | // diagonal 生成对角线 |
enter 时隐藏, update时 显示:
1 | // .attr('r', 0) 意为 隐藏,会在下面都 updateNodes.select("circle") 更新时,显示出来 .attr("r", 6) |
1 | updateNodes.select("circle") |
连点确定一线
1 | //开始绘制点,亮点成一线,起始点-source 终点-target 二点相连,就是连线 |
参考与demo地址
demo地址, 找到其中的 circle d3 demo
更多讲解看视频
走势图
demo介绍与d3使用经验
demo与效果
记录d3使用经验
本demo的笔记用于在于记录d3的使用经验,通过demo的编写,记下d3的使用经验,方便以后使用d3时借鉴。
一切都是 update enter exit
更新后原来的svg图未消除
使用d3重新绘制图形时,发现原来绘制的图形并没有消失,当时使用了js来remove dom,发现不能解决问题。
原来正确的解决之道在于d3的机制,除非你重新刷新整个页面,否则绘制的图形都需通过d3进行更新、新增、删除,对应update enter exit。
如何重绘与更新
如上讲解的,在d3中,必须通过update enter exit来进行重绘与更新,以及删除。
update enter exit必须配合data才得到
参考 博客《d3的三种模式 及 append、data、selectAll – data() – selectAll data enter exit 的联系》。
一切从上面二者开始到结束
基于以上的分析,在使用d3画图时,一切要从update enter exit开始,在刚开始画图时,就要建立这三者的模型,更多三者的使用,请查看 《update enter exit的使用》
三者使用的经典demo
update enter exit的使用
先建立模型
下面是经典的d3’建模’,一般画图一开始都是创建好下面代码,后面绘图都基于此:1
2
3
4var update = svg.selectAll(".MyCircle")
.data(pointDatas);
var enter = update.enter();
var exit = update.exit();
下面是基于上面代码的绘图:1
2
3
4
5
6
7
8
9
10
11
12
13
14
15
16
17
18enter.append("circle")
.attr("class", "MyCircle")
.attr("r", 4.5)
.attr("transform", function (point) {
return "translate(" + focusX + "," + focusY + ")"
})
.attr("fill",function(d,i){
return handleColor({type:d[3]}, colors);
})
update.attr("transform", function (point) {
return "translate(" + focusX + "," + focusY + ")"
})
.attr("fill",function(d,i){
return handleColor({type:d[3]}, colors);
})
exit.remove();
enter负责增加图形
参考上面代码。
update是enter缩减版
如上面的代码,update是在enter append的circle基础上,对这个circle的更新的。
如果不更新,使用enter就够了
如果图形没有更新重绘,就不存在更新与删除,只使用enter就够了。
记得使用exit.remove()
这才是d3删除图形的正确姿态。
d3的update enter exit 与react的生命周期函数
d3的update enter exit很像react的生命周期函数,有didmount unmount,有willupdate didupdate render 等等。
设置一个数组的技巧
有时候可以设置一个数组,以便得到update enter exit,不过这种做法感觉有点乖乖的,姑且这样用着。1
2
3
4
5
6// sar-chart/static/axis.js
var update = svg.selectAll("g.xAxis")
//data 后面的数组[1]只是任意写的,只要数组的长度为1就行,使用data,以便得到 enter、exit用来重绘。
.data([1]);
var enter = update.enter();
var exit = update.exit();
import module 的经典使用
本demo也是浏览器端直接使用import的经典使用,具体有以下注意:
html内使用import
html内使用import,需要 script type=”module”.1
2
3<script type="module">
import {dataset, padding, width, height, colors, handleColor} from './static/config.js';
</script>
js文件可直接使用import
如本demo中的config.js,直接使用了import:1
2//config.js
import {chartDatas} from './data.js';
必须使用全路径,且包含文件后缀
因为使用惯了webpack,通常不喜欢写文件后缀,岂知这些都是webpack替我们做了逻辑处理,而原生的js中,没有做任何处理,因此必须写明后缀。1
2
3
4
5//可以识别
import {chartDatas} from './data.js';
//不可以识别
import {chartDatas} from './data';