
koa2常用知识
context的别名
更多参看 官网 Request aliases Response aliases
摘录部分:1
2
3
4
5//Request aliases 下面的简写,都指的是Request
ctx.url -- ctx.request.url 的别名
ctx.method -- ctx.request.method 的别名
ctx.header
ctx.path
1 | //Response aliases 下面的简写,都指的是Request |
另外 ctx.req 是 ctx.request 的别名;
另外 ctx.res 是 ctx.response 的别名;
POST请求参数的获取
koa 没有封装获取post请求参数的方法,要么通过ctx.req.on原生方式,要么通过koa-bodyparser
方式一:
使用ctx.req.on原生方式。1
2
3
4
5
6
7
8
9
10
11
12
13
14
15
16app.use(async (ctx)=>{
let postdata='';
ctx.req.on('data', (data)=>{
postdata +=data;
})
ctx.req.on('end', ()=>{
console.log(postdata);
})
})
// 另起一个git bash 窗口执行以下命令,注意,
//一定用git bash, 因为cmd 没有curl命令
curl -d "param1=abc¶m2=qqw" http://localhost:3000/
// 在npm start 所在的cmd或git bash窗口,会出现 打印:
//param1=abc¶m2=qqw
方式二:
使用koa-bodyparser方式。koa-bodyparser的底层也是使用ctx.req.on实现的。1
2
3
4
5
6
7
8
9
10
11
12
13
14
15const Koa = require('koa')
const bodyparser = require('koa-bodyparser')
const app = new Koa()
app.use(bodyparser())
app.use(async (ctx, next)=>{
let postData = ctx.request.body;
console.log(postData);
})
app.listen(3000)
// 另起一个git bash 窗口执行以下命令,
curl -d "param1=abc¶m2=qqw" http://localhost:3000/
// 在npm start 所在的cmd或git bash窗口,会出现 打印:
//{ param1: 'abc', param2: 'qqw' }
有关content-type
先来看一个实例demo,感受下:
前端代码:1
2
3
4
5
6
7
8
9fetch('http://127.0.0.1:3000/test', {
method: 'GET', // or 'PUT'
headers: new Headers({
'Content-Type': 'image/png'
})
})
.then(res => res.text())
.catch(error => console.error('Error:', error))
.then(response => console.log('Success:', response));
后台代码:1
2
3
4
5
6
7
8
9
10
11
12const Koa = require('koa')
const bodyparser = require('koa-bodyparser')
var cors = require('koa2-cors');
const app = new Koa()
app.use(cors());
app.use(bodyparser())
app.use(async (ctx, next)=>{
  ctx.response.type='text';
  ctx.response.body='<p/>999<p/>';
})
app.listen(3000)
页面响应:

后续操作:
- 当切换设置不同的ctx.response.type=’text’;对应的Response Header 的 Content-type随之改变
另外一个实验:
前端代码:1
2
3
4
5
6
7
8
9fetch('http://127.0.0.1:3000/test', {
method: 'GET',
headers: new Headers({
'Content-Type': 'image/png'
})
})
.then(res => res.json())
.catch(error => console.error('Error:', error))
.then(response => console.log('Success:', response));
后台代码:1
2
3
4
5
6
7
8
9
10
11
12const Koa = require('koa')
const bodyparser = require('koa-bodyparser')
var cors = require('koa2-cors');
const app = new Koa()
app.use(cors());
app.use(bodyparser())
app.use(async (ctx, next)=>{
ctx.response.type='html';
ctx.response.body={data:'Hello World'};
})
app.listen(3000)
发现的现象:
- 设置不同的ctx.response.type=’html’时,Response Header 的 Content-type没有随之改变,还是显示为application/json
- 后台ctx.response.body={data:’Hello World’};改成 ctx.response.body=’‘;
前台代码不变,发现res.json()解析报错,Unexpected token < in JSON at position 0,
将res.json改成res.text就好了 - 后端实际的数据是json数据(ctx.response.body={data:’Hello World’}),但设置 ctx.response.type=’html’;然而并不影响前台通过res.json()正常解析到正确数据;
- 后端实际的数据是json数据(ctx.response.body={data:’Hello World’}),虽然前端设置了自定义Header content-type为image/png,但不影响前端正常解析,前端一样能正常获取数据。
得出结论:
结合上面页面响应的图片中:
- 一个请求,有两个content-type,分别是Response Header 和 Request Header上的。
- 小区别是 Response Header 的是首字母大写的 Content-type ,Request Header 的是首字母小写的 content-type;
- fetch 的 headers: new Headers({‘Content-Type’: ‘image/png’}) 设置的是 Request Header 的 content-type;
- Response Header 的 Content-type 是 原则上是ctx.response.type控制设置的,但如上例,有时Response Header 的 Content-type 是 浏览器或koa自动识别ctx.response.body数据类型设置的。
- fetch要想正确解析数据,需要根据后台实际数据,使用对应的解析方式,如 res.json() 、res.text()等等,如果解析方式不对,就报错。
- 另外注意的是,前端fetch的时候,如果自定义header,而且请求是跨域的,每发一次fetch,可能会产生两次请求,具体分析参见《koa2黑知识 – 跨域请求有时会发两次请求》:
常见的 content-type值–对应的ctx.response.type:
application/json – ctx.response.type=’json’
text/html – ctx.response.type=’html’
image/png – ctx.response.type=’image/png’
text/plain – ctx.response.type=’text’ 浏览器默认text/plain
设置响应状态码
通过ctx.status设置,ctx.status是ctx.response.status的别名1
2
3
4
5
6
7
8
9
10
11
12
13const Koa = require('koa')
const bodyparser = require('koa-bodyparser')
var cors = require('koa2-cors');
const app = new Koa()
app.use(cors());
app.use(bodyparser())
app.use(async (ctx, next)=>{
ctx.response.type='text';
ctx.status=562;
ctx.response.body='<p/>999<p/>';
})
app.listen(3000)
页面响应:
注意点:
koa-bodyparser的底层也是使用ctx.req.on实现的,所以不能同时使用 koa-bodyparser与ctx.req.on,否则,可能报错,
详见《koa2黑知识 – koa-bodyparser导致ctx.req.on事件失效》
如何在koa使用中间件
中间件是由app.use加载的
中间件一般都通过 app.use 函数来加载中间件1
2
3
4
5
6
7
8const app = new Koa()
app.use(cors());
app.use(bodyparser())
app.use(async (ctx, next)=>{
ctx.response.type='text';
ctx.response.body='<p/>999<p/>';
})
app.listen(3000)
中间件执行顺序
中间件在 koa中执行顺序,遵循洋葱模型方式:1
{% img url_for /image/koa2/middle.jpg %}
代码展示:1
2
3
4
5
6
7
8
9
10
11
12
13
14
15
16
17
18
19
20
21
22app.use(async (ctx, next)=>{
console.log('one start');
await next();
console.log('one end');
})
app.use(async (ctx, next)=>{
console.log('two start');
await next();
console.log('two end');
})
app.use(async (ctx, next)=>{
console.log('three start');
await next();
console.log('three end');
})
// one start
// two start
// three start
// three end
// two end
// one end
next()
next()返回一个Promise对象,配合await使用,可以达到阻塞后面程序执行,等待 next() 返回类似reject()才最终执行nex()后面的程序。
每个中间件必须使用next(),否则异常。
写一个中间件
这里动手写一个logger中间件小demo,用来打印日志:
原代码1
2
3
4
5app.use(async (ctx, next)=>{
console.log(ctx.method,ctx.host + ctx.url)
await next();
ctx.body = 'hellow world'
})
动手写一个logger中间件,用于打印日志,改造后如下:1
2
3
4
5
6
7
8
9
10
11const Koa = require('koa')
const app = new Koa()
const logger = async function(ctx, next){
console.log(ctx.method,ctx.host + ctx.url)
await next();
}
app.use(logger)
app.use(async (ctx, next)=>{
ctx.body = 'hellow world'
})
app.listen(3000)
两种鉴权方式
一种是广泛使用的Cookie认证模式;
一种是基于Token的认证模式, koa中可以结合jsonwebtoken 与 koa-jwt实现Token鉴权.异步到这里了解更多《jsonwebtoken 与 koa-jwt》.
这里是一个基于Token的鉴权demo
写一个返回文件的接口
使用fs实现的方式
写一个接口,可以将本地的文件,返回给客户端,主要使用fs开完成,核心代码:1
2
3
4
5
6
7
8
9
10
11
12
13
14
15
16
17
18
19
20
21
22
23
24const fs = require('fs');
const path = require('path');
const extname = path.extname;
const fpath = path.join(__dirname, './files/test.xlsx');
const fstat = await stat(fpath);
if (fstat.isFile()) {
ctx.type = extname(fpath);
ctx.body = fs.createReadStream(fpath);
}
function stat(file) {
return new Promise(function(resolve, reject) {
fs.stat(file, function(err, stat) {
if (err) {
reject(err);
} else {
resolve(stat);
}
});
});
}
完整demo;
本demo 参考了 koa 官网example,koa 官网example挺好,展示了很多功能,如果有需求,可先到这里找示例实现。
使用koa-static实现的方式
此方法参见《koa-static》,弊端是,无法自定义路由名称,只能以文件名称为接口url。
让html在浏览器中访问的四种方法
本方法同样适用于 jpg、txt、docx等等文件。
浏览器访问html的前身
这是一种原始的方式:1
2
3
4
5
6
7
8
9
10
11
12
13app.use(async (ctx) => {
let html = `
<h1>登录<\h1>
<form method = "POST" action= "/">
<p>用户名</p>
<input name="userName" /><br/>
<p>密码</p>
<input name="password" type="password" /><br/>
<button type="submit">submit</button>
</form>
`;
ctx.body=html;
})
koa-view方法一
1 | const views = require('koa-views') |
koa-view方法二
1 | const views = require('koa-views') |
koa-static方法一
1 | const serve = require('koa-static') |
最佳方法(koa-static方法二)
1 | const serve = require('koa-static') |
小结
在浏览器中输入http://localhost:3000,然后显示自己的index.html文件,一般使用的是koa-static或者是koa-views来实现。
最好的方法是使用koa-static来做,好处多多,窍门在于给在static内定义一个index.html,利用服务器默认找index.html特性,这样在浏览器中只干干净净显示url http://localhost:3000,非常好,而且koa-static自己封装路由处理很好,不会影响你在koa中定义的其他路由。
用koa-view也能达到目的,局限性大,会让你定义的其他路由失效,如果有疑问,可以用下面的demo测试研究一番。
以上四种情况,详细的demo
前后端一体的小demo
通过对上面两节的总结,写了一个有图片、xls、正常json的三种接口,
以及前端对于这三种不同类型数据如何处理。
本demo也可用于理解blob。
《写一个返回文件的接口 –为同一个demo》
文件上传-file和drap拖拽两种方式
服务端主要运用 koa-multer。
详细参考demo
也可参考:
《html笔记–文件上传-file和drap拖拽两种方式》
截取前端请求方案
koa启动服务,使用koa-view render 整个编译好的前端工程index.html, 此时index.html自然处于koa的同域名下,index.html发的每个请求都被koa 的app.use截取,在app.use内,再使用《服务端发起请求的方法》,组装数据,修改url,向指定服务器发起请求,而服务器之间请求没有跨域限制,成功的解决跨域。
这种方式最理想,因为不用修改后台,因为很多公司升级改造时,后台可以给你提供测试用户账号,因为老的项目客户正在使用,不能修改放开跨域限制的代码,遇到这种场景,就必须使用以上解决跨域的方式。
服务端截取请求向另外服务器发请求的demo
参考《服务端发起请求的方法》了解更多
参考《跨域请求有时会发两次请求》了解更多
服务端发起请求的方法
服务端发起请求可以轻松实现,koa截取前端请求组装数据后 转发请求的功能。
http方式
参考《http》
request方式
参考《request-promise-native request》
ctx.state
此属性,在做笔记为止,用的比较少,不用深究,用时再了解。
Koa 还约定了一个中间件的存储空间 ctx.state。通过 state 可以存储一些数据,比如用户数据,版本信息等。如果你使用 webpack 打包的话,可以使用中间件,将加载资源的方法作为 ctx.state 的属性传入到 view 层,方便获取资源路径。摘自此文
koa2黑知识
/favicon.ico
我们常加载dom时,会看到有一个/favicon.ico请求,这个是Dom渲染时,默认自带的静态资源。
this 指向 ctx
1 | app.use(async (ctx)=>{ |
koa-bodyparser导致ctx.req.on事件失效
下面代码会报错,因为koa-bodyparser的底层就是基于ctx.req.on实现的,如果使用了koa-bodyparser,它可能会劫持ctx.req.on这个事件,导致ctx.req.on事件失效1
2
3
4
5
6
7
8
9
10
11app.use(bodyparser())
app.use(async (ctx)=>{
let postdata='';
ctx.req.on('data', (data)=>{
postdata +=data;
})
ctx.req.on('end', ()=>{
console.log(postdata);
})
})
console.log('run in 3000')
解决的方法也简单,koa-bodyparser本来是为了方便获取ctx.req.on,使用了koa-bodyparser就没必要使用ctx.req.on。
或者用kctx.req.on,就不要用koa-bodyparser;
跨域的两种解决方式
koa2-cors解决跨域
使用
var cors = require(‘koa2-cors’);
app.use(cors());
将koa2-cors放在最上面
将koa2-cors放在最上面,让koa2-cors先于其他中间件执行:1
2
3
4
5
6
7
8
9
10
11
12
13
14
15
16
17
18app.use(cors()) // 解决跨域,跨域代码最好放在所有中间件前面
const views = require('koa-views')
const serve = require('koa-static')
const { resolve } = require('path')
const handlePath = path => resolve(__dirname, path)
app.use(serve(handlePath('../pages/static')))
app.use(views(handlePath('../pages')), {
extension: 'html'
})
app.use(async (ctx) => {
await ctx.render('index.html')
})
app.use(bodyparser())// 解析post参数
app.use(router.routes())// 调用路由中间件
app.use(router.allowedMethods())// 对异常状态码处理
app.listen(3000, ()=>{
console.log('server is running at http://localhost:3000')
})
优缺点
需要修改后台,需要后台放开跨域限制,如果后台已经投产,客户正在使用该后台,那么肯定不能放开跨域限制,这种跨域解决方法就满足不了需求。
服务端向服务端发请求解决跨域
实现方法
参考《截取前端请求方案》
参考《跨域请求有时会发两次请求》
参考《跨域请求有时会发两次请求》
这里有一个服务端截取前端请求,转发给指定服务器的demo,不过该demo只做了一个接口的转发,看本例了解下这种模式
优缺点
优点是,不用修改后台,这种方法非常适合后台在使用,而要做产品升级的项目,缺点是,前端项目工程配置麻烦。
/home/:id/:name 路由对应的url
router.get(‘/home’ —对应 http://localhost:3000/home?id=01&name=admin
router.get(‘/home/:id/:name’ —对应 http://localhost:3000/home/01/admin
跨域请求有时会发两次请求
当前端fetch自定了header时,且接口跨域时,fetch一次,可能会发两次相同请求,两次请求一次是Request Method: OPTIONS的,
一次是Request Method: GET的,
原来fetch在发送真正的请求前, 会先发送一个方法为OPTIONS的预请求(preflight request), 用于试探服务端是否能接受真正的请求详细原因参见这里;
解决之道就是把自定义headers字段删掉后;
或者不要使用require(‘koa2-cors’)的方式解决跨域,可以通过服务端请求服务器的方式解决跨域;
因为跨域是浏览器的限制机制,而服务器与服务器之间不存在跨域问题,具体思路:
在同域名下通过 koa 截取 项目的所有fetch请求,然后使用 request 模块,通过 request 给另外域名下的服务器发请求,服务端截取请求向另外服务器发请求的demo
后台报错app有错误日志,也会报跨域错误
如果配置了koa2-cors解决跨域,但请求时有跨域报错,可能是app.use内部程序执行报错,会导致后台响应异常,然后前台可能显示为跨域限制错误
奇怪的阻塞
不带async
如下,执行顺序将为: 1 3 2 4。
首先打印1;
然后进入下个中间件,打印3;
因为加了await,所以下面的程序被阻塞了;
一旦阻塞,程序将先执行未被阻塞的 2,所以打印了2;
当get请求完毕,阻塞解除,执行4;
1 | const koa = require('koa'); |
上面这种执行顺序没有按照洋葱模型顺序执行,不是我们想要的,如何解决呢?
带async
其他不变,就下面的变化,打印顺序就是洋葱模型执行的正常顺序:
1 3 4 21
2
3
4
5
6app.use(async(ctx, next)=>{
console.log(1)
ctx.body = 'Hello World';
await next()
console.log(2)
})
保证洋葱模型-中间件必须带async、await
具体参考《奇怪的阻塞》,为了保证中间件像洋葱模型的顺序一层一层执行程序,必须带上async、await。
为什么要保证洋葱模型
如果保证了洋葱模型,我们就可以确定,await next()之后,执行的代码肯定是后面中间件以及执行完成了的;
也就是说,console.log(2)肯定是下面的中间件程序执行完后才执行的。1
2
3
4
5app.use(async(ctx, next)=>{
console.log(1)
await next()
console.log(2)//保证这个打印是在下面所以中间件执行完成之后,才执行。
})
koa2模块上
koa-router
Usage
1 | const Koa = require('koa') |
关键 是在最后使用1
2app.use(router.routes())// 调用路由中间件
app.use(router.allowedMethods())// 对异常状态码处理
当然,如果你不想处理异常状态码,完全可以不使用router.allowedMethods(),单独使用router.routes()即可。
模拟路由中间件
下面模拟路由写的中间件,可以加深对路由中间件的理解1
2
3
4
5
6
7
8
9
10
11
12
13
14
15
16
17
18
19
20
21
22
23
24class Router{
constructor(){
this._routers = [];
}
get(url, handler){
this._routers.push({
url:url,
method:'GET',
handler
})
}
routes(){
return async (ctx, next) => {
const {method, url} = ctx;
const matchedRouter = this._routers.find(r => r.method === method && r.url === url);
if( matchedRouter &&
matchedRouter.handler){
await matchedRouter.handler(context, next);
}else{
await next();
}
}
}
}
koa-static
介绍 和 demo
koa-static是静态资源请求中间件,这里写了一个简单的demo,可启动感受下,下面以该demo源码作为示例讲解koa-static;1
app.use(serve(handlePath('../pages/static')))
通过图片可以看出项目静态文件目录结构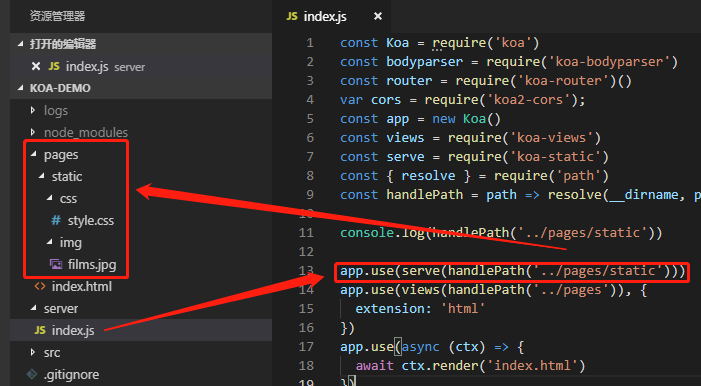
配置上面这句代码后,你讲可以在浏览器上运行可现实文件内容:1
2http://127.0.0.1:3000/css/style.css
http://127.0.0.1:3000/img/films.jpg
注意哦,不是 http://127.0.0.1:3000/pages/static/css/style.css !!这个地址是找不到的,很多刚用koa-static时都会犯这个错,认为就是handlePath(‘../pages/static’) 定义的url,然后就拼接成了:1
2//这个地址是访问不到的
http://127.0.0.1:3000/pages/static/css/style.css
理解koa-static
koa-static是静态资源请求中间件,不过这样说,我们并不能直观理解koa-static是什么,原理是什么。
我们大可将koa-static看成是一个 为提供目录下每个文件 配置路由的中间件,
只要你提供一个文件的具体位置给koa-static,koa-static会结合路由的功能,为每个该文件位置下的文件配置一个 url 路由;
这个url路由其实就是一个普通的接口url,我们将这个普通的url输入浏览器,回车就可以看到改接口url的返回内容;
koa-static是个批量配置接口url的中间件
所以,koa-static其实是一个很棒批量配置接口url的中间件,可以为你提供的文件目录下的所有文件批量配置好url接口,
你就可以轻松通过此url接口访问此文件。
koa-views
介绍 和 demo
如果我们只需要ctx.body只需要返回一段简单的代码如下,那么就用不到koa-views。1
ctx.response.body = '<h1>404 Not Found</h1>'
如果我们要ctx.response.body直接返回一个如下复杂的html,这个时候,再去拼接字符串太麻烦,
koa-views就是让body返回html变得简单,你直接单独定义好一个html,然后直接引用此html即可,非常方便。
koa-views可以用于普通的html文件,也可以用于模板引擎,用于模板引擎的时候,可通过ctx.state传值;1
2
3
4
5
6
7
8
9
10
11let html = `
<h1>登录<\h1>
<form method = "POST" action= "/">
<p>用户名</p>
<input name="userName" /><br/>
<p>密码</p>
<input name="password" type="password" /><br/>
<button type="submit">submit</button>
</form>
`
ctx.body=html;
这里写了一个简单的demo,可启动感受下加深理解。
此demo和《koa-static》demo是同一个
koa-views的使用
1 | const views = require('koa-views') |
render是koa-views集成到ctx的
如上的代码,ctx本身没有render方法,只是使用koa-views中间件后,ctx才有这个方法的
index.html中静态文件的路径
请结合上面demo源码看(此demo和《koa-static》demo是同一个)
项目路径和请看参看 《koa-static》的图片
1 | app.use(serve(handlePath('../pages/static'))) |
我们在《koa-static》中知道css和jpg的访问接口url是:1
2http://127.0.0.1:3000/css/style.css
http://127.0.0.1:3000/img/films.jpg
此时,index.html的css和img的路径应该配置为如下,1
2
3
4
5
6
7
8
9
10
11
12<!DOCTYPE html>
<html>
<head>
<meta charset="utf-8">
<meta name="viewport" content="width=device-width, initial-scale=1">
<title>东成西就</title>
<link rel="stylesheet" href="/css/style.css"></head>
<body>
<div class="films">东成西就就是棒!</div>
<img src="/img/films.jpg" />
</body>
</html>
koa-bodyparser
此中间件的作用 是 把POST请求的参数解析到ctx.request.body中,koa-bodyparser底层就是基于ctx.req.on实现的。
其他信息见《koa-bodyparser导致ctx.req.on事件失效》 《POST请求参数的获取》
jsonwebtoken 与 koa-jwt
jsonwebtoken 简称 JWT,用来实现Token的生成、校验和解码。
使用koa-jwt中间件可以将 jsonwebtoken与koa有机结合起来。
jsonwebtoken 与 koa-jwt 的关系,就跟 redux 与react-redux的关系。
这里是一个基于Token的鉴权demo。
使用方法:
一般方案为:登录是,koa通过jsonwebtoken给用户一个Token编码,之后客户端发送请求时,在Header上都带上此Token码,
后端接受请求时,验证此Token码进行鉴权。
1 | const { sign } = require('jsonwebtoken'); |
http
http说的是 require(‘http’)模块。
koa利用http直接从服务端向其他服务器发起请求,
如下,koa服务端,接收到请求时,在路由函数体内,将请求参数重新组装,通过http,转发给对应服务器。
这种方法好处之一是避免跨域问题。
1 | const Http = require('http'); |
request-promise-native request
以下是自己对request-promise-native request的直观理解,没有深入研究,对不对待考:
request-promise-native 可能依赖 request,安装好request-promise-native会自动安装request,
所以request-promise-native 和request是一回事,request-promise-native是request的增强版,
他们都只做一件事,在服务器发起接口请求,与同为服务器发请求的http效果一样;
与浏览器端发请求的fetch axios功能一样,作用的环境不一样而已。
暂时不用过多了解,用时深究,这里有一个用到request-promise-native request的demo,
完整http request的demo。
koa-multer
express或koa,收到前台的上传请求后,因为上传文件的请求时一个多类型文件数据(multipart/form-data)请求,
必须通过require(‘multer’)才能正常处理这样的请求。
multer就是为了 处理多文件接口而生。
multer同koa-multer,去koa-multer的GitHub上,已经说明其文档直接参考express的multer。
更多参考《文件上传-file和drap拖拽两种方式》
koa-multer 用来做文件上传功能,需要配合 fs模块一起,比较简单,这是文件上传koa-multer 和fs demo。
fs
demo和介绍,参考《koa-multer》《写一个返回文件的接口》,这两部分都有demo,使用fs做了一个文件上传和读取本地文件并返回给前台的功能
koa2模块下
koa2-cors
参考《koa2-cors解决跨域》
querystring
querystring模块有以下作用1
2
3
4
5const Querystring = require('querystring')
Querystring.escape('id=1') //返回 id%3D1
Querystring.unescape('id%3D1') //返回 id=1
querystring.parse('foo=bar&abc=xyz&abc=123') //返回 {foo: 'bar',abc: ['xyz', '123']}
querystring.stringify({ foo: 'bar', baz: ['qux', 'quux'], corge: '' }) // 返回 'foo=bar&baz=qux&baz=quux&corge='
koa-json、log4js、ip
这里只放一个demo,不深入了解,用到的时候再深究,此demo包含koa-static、log4js与ip、koa-json、koa-nunjucks
koa-nunjucks
koa-nunjucks是基于nunjucks的html 模板中间件。
没有什么太复杂的需求,只是用koa玩玩,如果不用html模板,用koa-views就可以了,如果要用html模板,可以用koa-nunjucks,当然也可以用ejs模板,等等,有很多这方面的模板。
这里只放一个demo,不过多解释,用到的时候再了解。
koa-nunjucks的使用demo
ejs pug
暂时不用过多了解,用时深究,参见demo。
puppeteer parcel-bundler glob
暂时不用过多了解,用时深究,参见demo。
RESTfull 和 http
RESTful 规范
非RESTful规范定义的接口:1
2
3router.get(/app/adduser)
router.get(/app/edituser)
router.get(/app/deleteuser)
基于RESTful规范设计的API,全局只提供唯一的URI /app/user
设计如下:1
2
3router.post(/app/user) //新增用户id
router.edit(/app/user:id) 编辑名字为id的用户
router.delete(/app/user:id) 删除名字为id的用户
URL 的7个部分组成:
scheme:[//[user[:password]@]host[:post][/path][?query][#fragemnt]
scheme:使用协议 如FTP、HTTP等
user[:password] : 表示访问资源的用户和密码,常见于FTP协议
host 主机
port 端口
path 访问资源路径
query 请求数据,以?开头
fragment 定位锚点,以#开头,可用于快速定位网页对应段落
常用http状态码
1 消息 100 继续,继续响应剩余部分,如已完成,可忽略
2 成功
3 重定向 301 永久移动; 302 临时移动; 304 未修改,请求资源对比上次没有修改
4 请求错误 401 未授权 ; 403 禁止; 404 未找到;
5 和 6 服务器错误 500 服务器内部错误; 503 服务不可用;
相关demo
koa-demo
主要的示例demo:koa-demo;
koa2_films
很好的综合运行demo(含爬虫,mongodb,koa,前后端一体化编译开发):koa2_films/koa_web,
此仓库其他分支还有单纯的 开发后台的分支;
也有单纯的爬虫demo:爬虫小demo;
还有一个分支为:nodejs 异步io的理解 阻塞非阻塞,事件循环与驱动,单线程,子进程,进程通讯)events 框架demo;
服务端截取请求向另外服务器发请求的demo;
films_new
films_new是react-redux-demo仓库下的分支。
这是前端代码,用来像后台发起请求。
koa-miniprogram
此项目为微信开发,《koa与node.js开发实战》 书第九章以后的代码,在此仓库,我整理成单独几份,暂时没有微信学习,将源码整理备份,以备以后用。
其中particle-css分支挺好的一个css页面,同时还有超炫背景粒子-particlesJS插件的使用 效果:
参考和学习资料
koa与node.js开发实战
Koa2框架从0开始构建预告片网站
koa 官网
koa github
koa example,挺好的官方示例,比较全,做需求时可先在这找示例
koa2入门笔记